Everything You Need to Know About Arduino Code
Since the launch of the Arduino open-source platform, the brand has established themselves at the center of an expansive open-source community. The Arduino ecosystem is comprised of a diverse combination of hardware and software. The versatility of Arduino and its simple interface makes it a leading choice for a wide range of users around the world from hobbyists, designers, and artists to product prototypes.
The Arduino board is connected to a computer via USB, where it connects with the Arduino development environment (IDE). The user writes the Arduino code in the IDE, then uploads it to the microcontroller which executes the code, interacting with inputs and outputs such as sensors, motors, and lights.
Both beginners and experts have access to a wealth of free resources and materials to support them. Users can look up information on how to set up their board or even how to code on Arduino. The open source behind Arduino has made it particularly friendly to new and experienced users. There are thousands of Arduino code examples available online. In this post, we’ll take you through some basic principles of coding for Arduino.
Plan Your Next Arduino Project >>
Arduino code is written in C++ with an addition of special methods and functions, which we’ll mention later on. C++ is a human-readable programming language. When you create a ‘sketch’ (the name given to Arduino code files), it is processed and compiled to machine language.
The Arduino Integrated Development Environment (IDE) is the main text editing program used for Arduino programming. It is where you’ll be typing up your code before uploading it to the board you want to program. Arduino code is referred to as sketches.
Note: It's important to use the latest version of Arduino IDE. From time to time, check for updates here.
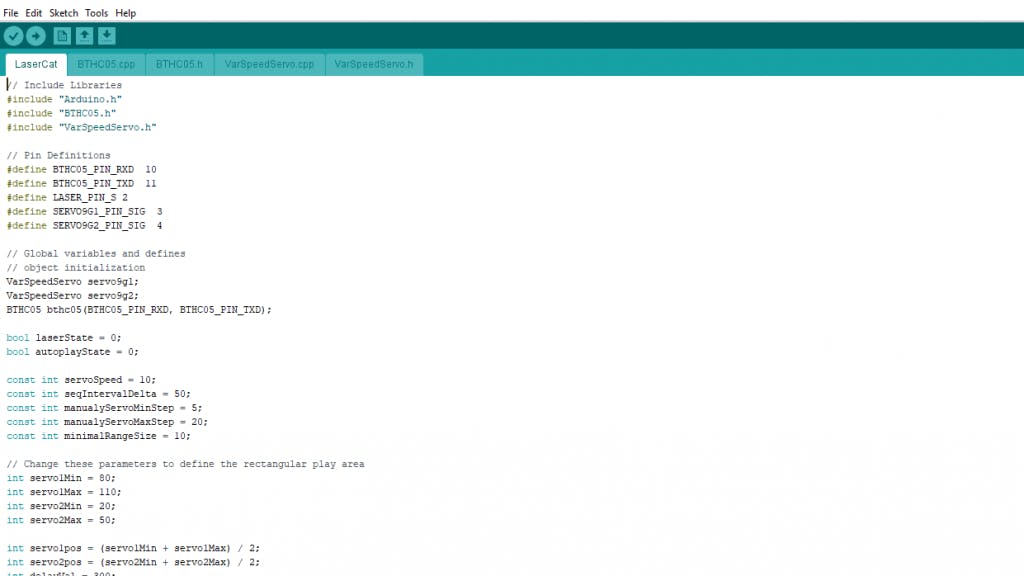
Arduino code example
As you can see, the IDE has a minimalist design. There are only 5 headings on the menu bar, as well as a series of buttons underneath which allow you to verify and upload your sketches. Essentially, the IDE translates and compiles your sketches into code that Arduino can understand. Once your Arduino code is compiled it’s then uploaded to the board’s memory.
All the user has to do to start compiling their sketch is press a button (a guide to this can be found below).
If there are any errors in the Arduino code a warning message will flag up prompting the user to make changes. Most new users often experience difficulty with compiling because of Arduino’s stringent syntax requirements. If you make any mistakes in your punctuation when using Arduino, the code won’t compile and you’ll be met with an error message.
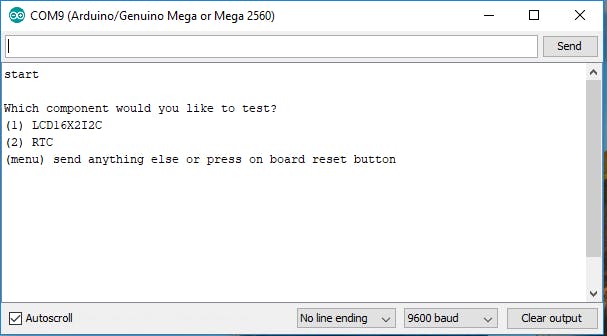
Arduino serial monitor can be opened by clicking on the magnifying glass icon on the upper right side of the IDE or under tools. The serial monitor is used mainly for interacting with the Arduino board using the computer, and is a great tool for real-time monitoring and debugging. In order to use the monitor, you’ll need to use the Serial class.
The code you download from circuito.io has a test section that helps you test each components using the serial monitor, as you can see in the screenshot below:
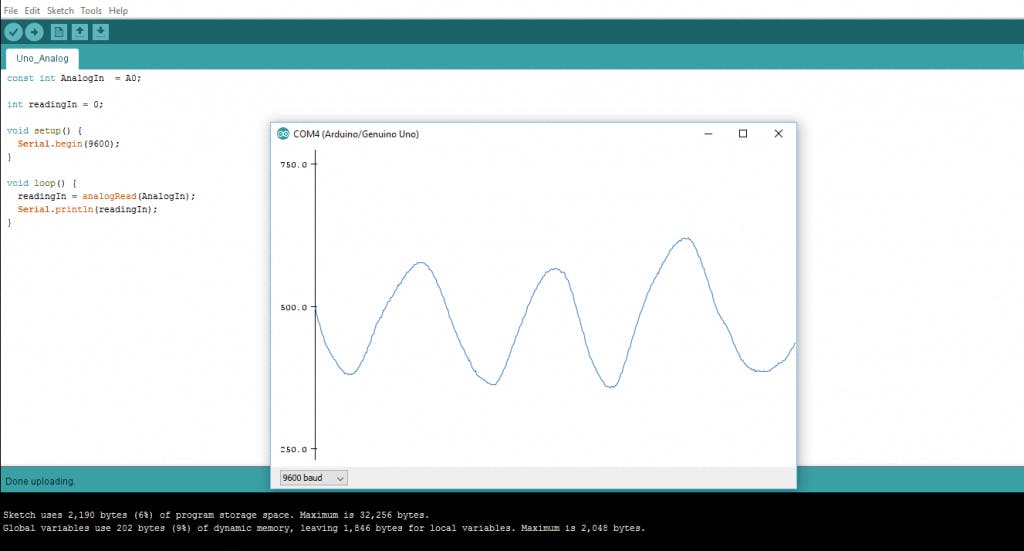
Arduino serial plotter is another component of the Arduino IDE, which allows you to generate a real-time graph of your serial data. The serial plotter makes it much easier for you to analyze your data through a visual display. You’re able to create graphs, negative value graphs, and conduct waveform analysis.
Unlike other software programming platforms, Arduino doesn’t have an onboard debugger. Users can either use third-party software, or they can utilize the serial monitor to print Arduino’s active processes for monitoring and debugging.
By using the Serial class, you can print to the serial monitor, debugging comments and values of variables. On most Arduino models, this will be using serial pins 0 and 1 which are connected to the USB port.
In Arduino, much like other leading programming platforms, there are built-in libraries that provide basic functionality. In addition, it’s possible to import other libraries and expand the Arduino board capabilities and features. These libraries are roughly divided into libraries that interact with a specific component or those that implement new functions.
To import a new library, you need to go to Sketch > Import Library
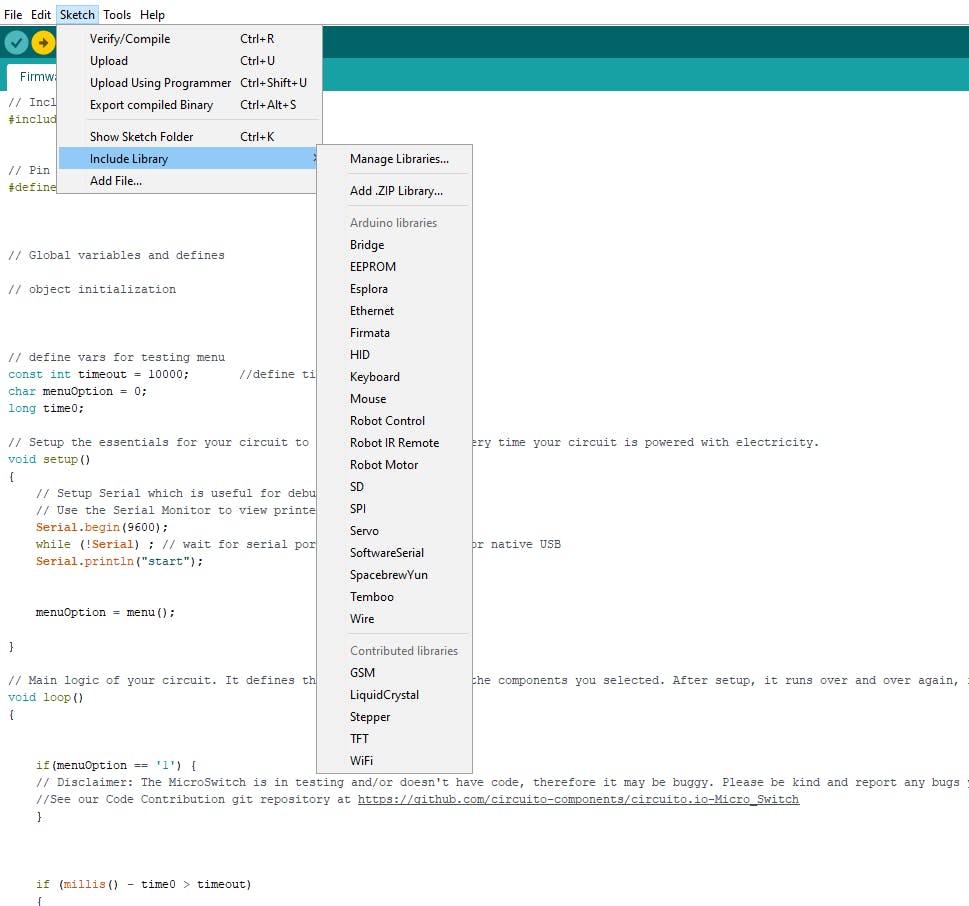
In addition, at the top of your .ino file, you need to use ‘#include’ to include external libraries. You can also create custom libraries to use in isolated sketches.
To use the Arduino pins, you need to define which pin is being used and its functionality. A convenient way to define the used pins is by using:
‘#define pinName pinNumber’.
The functionality is either input or output and is defined by using the pinMode () method in the setup section.
Whenever you’re using Arduino, you need to declare global variables and instances to be used later on. In a nutshell, a variable allows you to name and store a value to be used in the future. For example, you would store data acquired from a sensor in order to use it later. To declare a variable you simply define its type, name and initial value.
It’s worth mentioning that declaring global variables isn’t an absolute necessity. However, it’s advisable that you declare your variables to make it easy to utilize your values further down the line.
In software programming, a class is a collection of functions and variables that are kept together in one place. Each class has a special function known as a constructor, which is used to create an instance of the class. In order to use the functions of the class, we need to declare an instance for it.
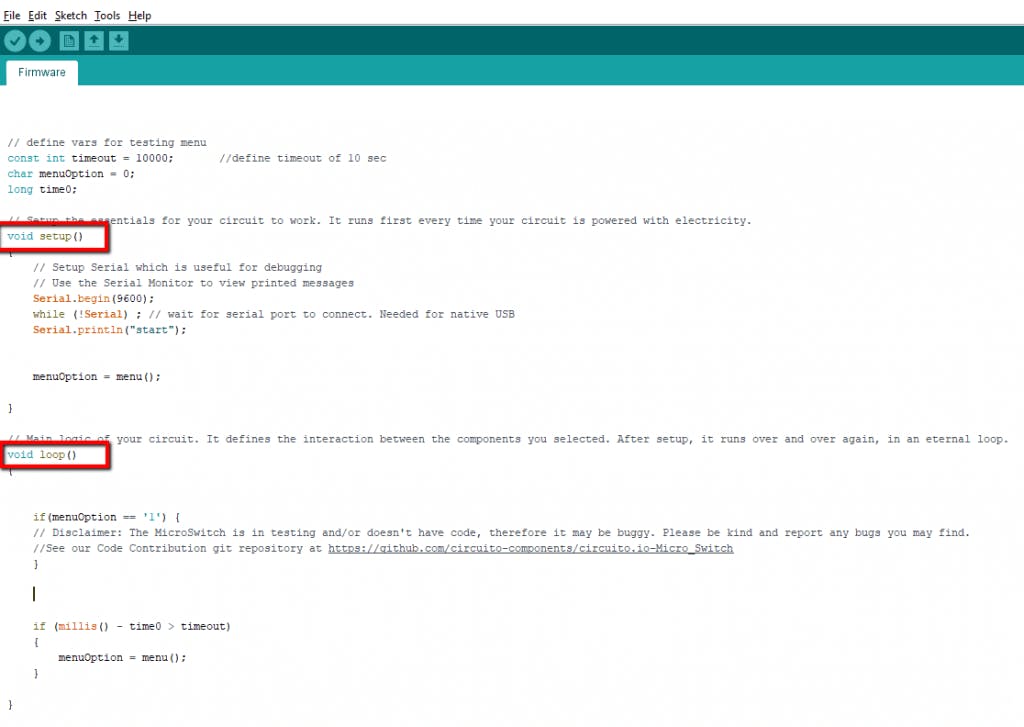
Setup()
Every Arduino sketch must have a setup function. This function defines the initial state of the Arduino upon boot and runs only once.
Here we’ll define the following:
Loop()
The loop function is also a must for every Arduino sketch and executes once setup() is complete. It is the main function and as its name hints, it runs in a loop over and over again. The loop describes the main logic of your circuit.
For example:
Note: The use of the term ‘void’ means that the function doesn’t return any values.
The basic Arduino code logic is an “if-then” structure and can be divided into 4 blocks:
Setup - will usually be written in the setup section of the Arduino code, and performs things that need to be done only once, such as sensor calibration.
Input - at the beginning of the loop, read the inputs. These values will be used as conditions (“if”) such as the ambient light reading from an LDR using analogRead().
Manipulate Data - this section is used to transform the data into a more convenient form or perform calculations. For instance, the AnalogRead() gives a reading of 0-1023 which can be mapped to a range of 0-255 to be used for PWM.(see analogWrite())
Output - this section defines the final outcome of the logic (“then”) according to the data calculated in the previous step. Looking at our example of the LDR and PWM, turn on an LED only when the ambient light level goes below a certain threshold.
A library is a folder comprised of files with C++ (.cpp) code files and C++ (.h) header files.
The .h file describes the structure of the library and declares all its variables and functions.
The .cpp file holds the function implementation.
The first thing you need to do is find the library you want to use out of the many libraries available online. After downloading it to your computer, you just need to open Arduino IDE and click on Sketch > Include Library > Manage Libraries. You can then select the library that you want to import into the IDE. Once the process is complete the library will be available in the sketch menu.
In the code provided by circuito.io instead of adding external libraries like mentioned before, we provide them with the firmware folder. In this case, the IDE knows how to find them when using #include.
From Software to Hardware
There is a lot to be said of Arduino’s software capabilities, but it’s important to remember that the platform is comprised of both software and hardware. The two work in tandem to run a complex operating system.
Code → Compile → Upload → Run
At the core of Arduino, is the ability to compile and run the code.
After writing the code in the IDE you need to upload it to the Arduino. Clicking the Upload button (the right-facing arrow icon), will compile the code and upload it if it passed compilation. Once your upload is complete, the program will start running automatically.
You can also do this step by step:
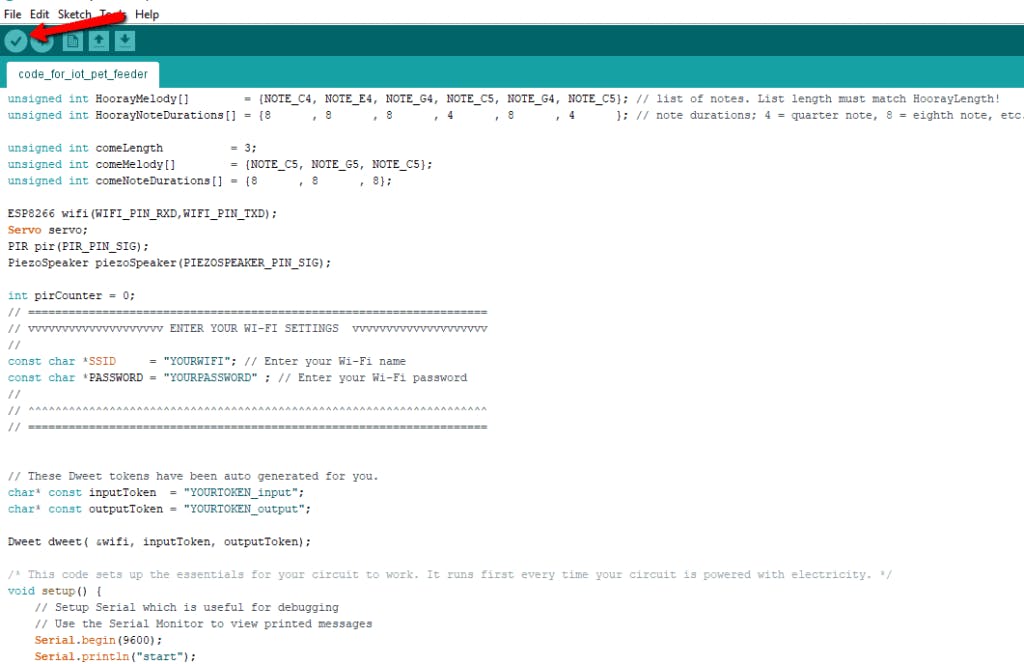
As you can see, the check icon is located in the top left underneath the “File” tag in the menu section.
Once you’ve done this, Arduino will start to compile. Once it's finished, you’ll receive a completion message that looks like this:

As you can see, the green line at the bottom of the page tells you that you’re “done compiling”. If your code fails to run, you’ll be notified in the same section, and the problematic code will be highlighted for editing.
Once you’ve compiled your sketch, it’s time to upload it.
Once complete, you’ll be greeted with a completion message that tells you Arduino has finished uploading.
Setting Up Your IDE
In order to connect an Arduino board to your computer you need a USB cable. When using the Arduino UNO, the USB transfers the data in the program directly to your board. The USB cable is used to power your arduino. You can also run your Arduino through an external power source.
Before you can upload the code, there are some settings that you need to configure.
Choose your board - You need to designate which Arduino board you’re going to be using. Do this by click Tools > Board > Your Board.
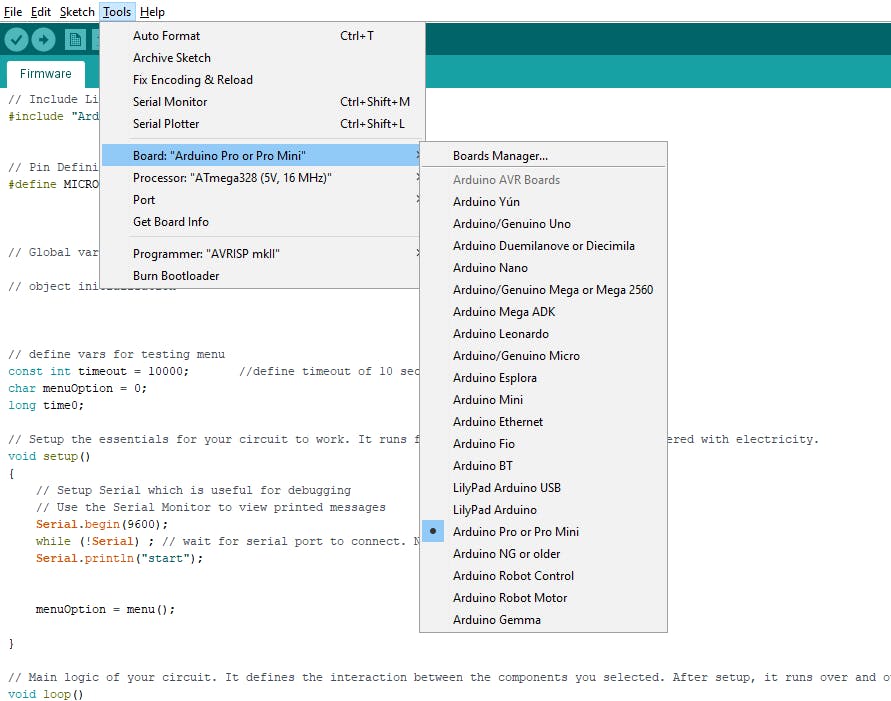
Choose your processor- there are certain boards (for example Arduino pro-mini) for which you need to specify which processor model you have. Under tools > processor > select the model you have.
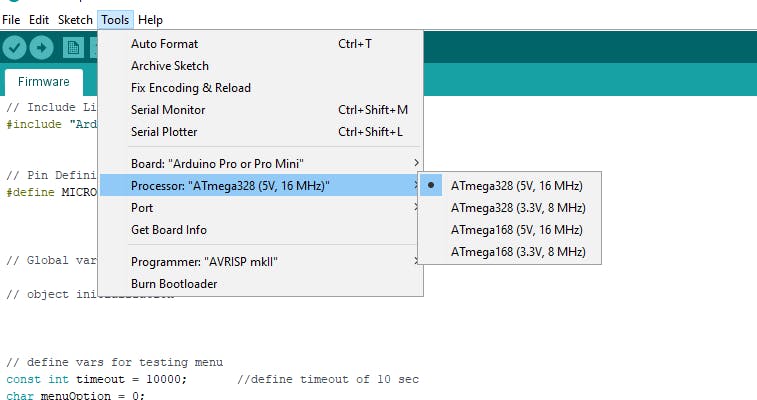
Choose your port - to select the port to which your board is connected, go to tools > Port > COMX Arduino (This is Arduino’s serial port).
How to Install Non-Native Boards (e.g. NodeMCU)
Some board models are not pre-installed in the Arduino IDE, therefore you’ll need to install them before you can upload code.
To install a non-native board such as NodeMCU, you need to:
Some boards cannot be found through the Board Manager. In this case, you’ll need to add them manually. In order to do this:
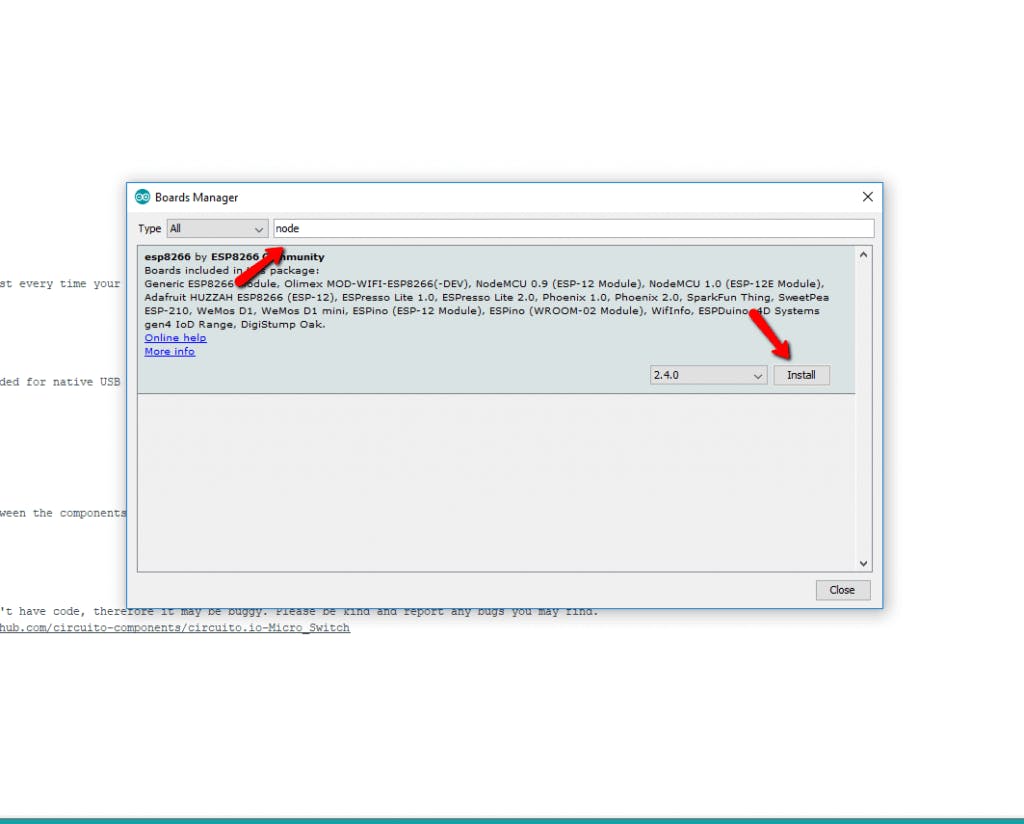
Once you’ve completed this step, you will see the installed boards in the boards’ list under tools.
Note: the process may differ slightly for different boards.
Arduino is far more than just a simple microcontroller. With an expansive IDE and a vast array of hardware configurations, Arduino is truly a diverse platform. The variety of its libraries and its intuitive design makes it a favorite for new users and experienced makers alike. There are thousands of community resources to help you get started with both hardware and software.
As you advance your skills, you may face problems that require debugging, which is a weak spot of the Arduino IDE. Luckily, there are several tools and methods to debug Arduino hardware and software. In the next article, we’re going to look at how to debug Arduino (and how to test Arduino code) as well as how to use simulators and emulators.