Home Gas & Smoke Detector
In this Circuito of the Week we’ll show you how you can make a gas and smoke detector. Gas and smoke detectors are a very useful and affordable build. They can prevent large damage caused by fires and even save lives if they detect dangerous gas leaks.
Photo by John Cafazza on Unsplash
We are going to use two gas/smoke sensors: MQ-2 and MQ-135. Each of these sensors is sensitive to specific types of gas. The internal sensing element is heated up by the current flow, causing nearby gases to ionize and be absorbed by the sensor.
This causes the sensing element’s resistance to drops thus increasing its conductivity.
We are going to connect the sensors to an LCD screen, an LED and a Piezo Speaker that will give us an alert when the gas/smoke level rises above the desired limit.We’re also going to pair it with the ESP8266 Wifi module so we can integrate it into our smart home system for remote monitoring.
Click this link or the image below to see the circuit components:

Let’s go into detail about the components:
MQ-2 - This sensor is sensitive to flammable and combustible gasses such as Methane, Butane, LPG and smoke.
MQ-135 - The MQ-135 can detect a wide range of gases, including NH3, NOx, alcohol, benzene, smoke, and CO2.
Calibrating the gas sensors - the sensors need to be calibrated by the user in the code. In order to do so, in the setup function add a loop to average some measurements (don’t forget to add a short delay) and save this average value in a variable. Later on, when reading from the sensor, you should always subtract the calibration value to get the reading of the sensor relative to the initial state.
RGB LED - This LED allows you to control its color by setting the intensity of RED, GREEN, and BLUE from 0 (no color) to 255 (max color intensity). We can set it to change color when hazardous levels are reached or when there are errors collecting data.
LCD 16X2 I2C - A small LCD screen, allowing the display of a short message or simple drawings via I2C interface.
Piezo Speaker - A very small vibration speaker, that allows you to play simple tones and basic melodies.
ESP8266 ESP8266 - a low-cost Wi-Fi board, that you can easily wire to a microcontroller, and connect any project you build to the internet.
Arduino Uno - Arduino/Genuino Uno is a microcontroller board based on the ATmega328P. It has 14 digital input/output pins (of which 6 can be used as PWM outputs), 6 analog inputs, a 16 MHz quartz crystal, a USB connection, a power jack and a reset button.
Generic secondary components – non-electronic components you can find in almost every circuit. Such as breadboards, jumper wires, etc.
Specific secondary components – components added to the circuit according to the specific components we want to use. For example resistors, voltage regulators, capacitors, etc. which are present in order to adjust current flow and voltage levels.
You can find information about the secondary components you need for each core component in datasheets and example circuits, and you can also calculate some of their values on your own. When using circuito.io circuit generator, the values of the secondary components are calculated for you automatically.
Breadboard – best for prototyping. Allows you to electrically connect different components using jumper wires. Jumper Wires M/F and M/M – used for connecting components to the breadboard. USB Cable – connects the microcontroller to the computer, for uploading code. Male headers – soldered to different components, in this circuit, it is added to the Logic Level Converter.
Resistors - a passive two-terminal electrical component that implements electrical resistance as a circuit element. In electronic circuits, resistors are used to reduce current flow, adjust signal levels, to divide voltages, bias active elements, terminate transmission lines and much more.
100 and 220 Ohm resistors - these resistors are used for the RGB LED in this project. One for each color.
1K Ohm resistor - required for the Piezo speaker.
Transistor - NPN BC337 - can be used as amplifiers or switches, giving them wide applicability in electronic equipment, including computers, televisions, mobile phones, audio amplifiers, industrial control, and radio transmitters. In this circuit, it’s required for the Piezo speaker.
Logic level converter – coordinates voltage levels between 5V controllers and 3.3V components and vice versa. In this circuit, it’s required for the ESP8266.
All of the components* for your circuit can be purchased through the circuito.io website, by clicking on Review & Buy on the right bottom corner. You can, of course, buy the components from any other distributor, online store or local electronics store. Here’s a list of some great maker-oriented online stores that you can check out.
* some of the components may be temporarily out of stock
Click this link or the image below to see the wiring diagram for the smoke and gas detector circuit. If you want to see a detailed step by step wiring guide and the test code, click on view project guideview project guide at the bottom of the circuit.

After putting the circuit together, you can download the test code from the project guideproject guide and upload it to your Arduino to check your connectivity.
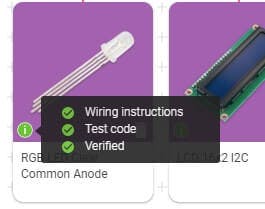
Note: not all the components have a test code. You can check if the component has a test code by hovering over the “i” icon next to the component
We hope you found this short example useful, and that it will give you more ideas on what you can make with circuito.io. If you have any questions, you are welcome to write them in the comments below. See you on the next Circuito of the Week!