How to Burn the Bootloader onto the ATtiny85
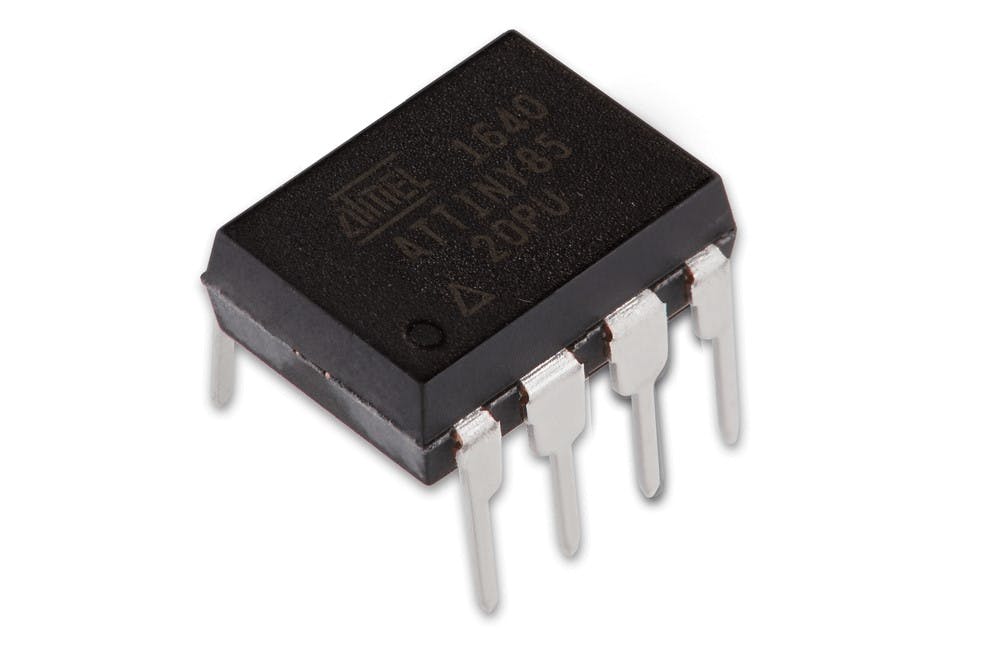
The ATtiny85 is one of the smallest microcontrollers in the AVR market, making it a great match for portable projects with small footprints and low power requirements. But getting your code onto the chip can be a little bit of a challenge. When you start using the ATtiny85, you won’t have the benefit of an development board: you’ll be working with a bare-bones, standalone chip.
Fortunately, we’re here to help get you started. In this post, we’re going to examine this microcontroller. We’ll look at its functions and features, and guide you through the process of burning its bootloader so you can program it.
One of the more convenient ways to load your program data onto the ATtiny MCU is through a special program called a bootloader. This program sits on the MCU and listens for incoming instructions, and then writes new program information to the MCU’s memory.
This removes the need for special external hardware, but it does have a few drawbacks: A bootloader will consume a little of the MCU’s storage space, and introduce a minor delay to the startup process as the program runs and searches for new instructions.
Bootloaders make life convenient during the prototyping phase of any project, and they’re also convenient for products whose firmware needs to be updated over time. With the help of the bootloader, you’ll be able to load code from your Arduino IDE onto the ATtiny85 using a USB connection. This means that you won’t need to remove the MCU from your circuit in between programming rounds.
In theory, burning a bootloader is something that you only need to do once. You can use it again and again as you refine your program. With that said, the ATtiny lacks a protected storage area for the bootloader, which means that there’s a minor danger of overwriting this space by mistake. This can be solved by simply reloading the bootloader.
We can upload the bootloader by using the Arduino as an ISP, or In-System Programmer. This allows new programs to be uploaded to the ATtiny without removing the chip from the circuit it’s being used in.
By default, the Arduino IDE lacks the ability to upload directly to an ATtiny. This can be easily fixed using the program’s ‘additional boards manager’, which can be found by navigating to: File>Preferences
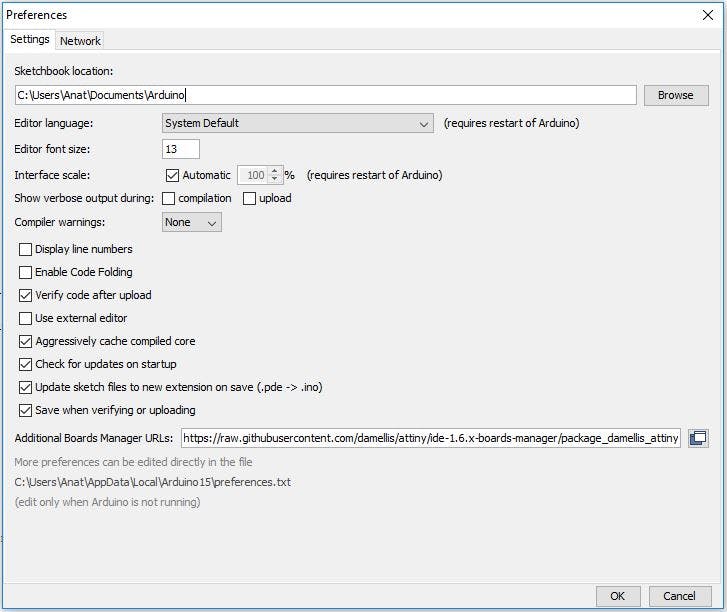
At the bottom of the preferences window is a space to enter Additional Board Manager URLs. Enter the following before clicking ‘OK’:
This will add support for ATtiny85, courtesy of David Mellis, one of Arduino’s co-founders.
You’ll need to select and install the package from the Boards Manager before the chip becomes visible under the ‘boards’ list.
Once we’ve gotten the software in place, we need to wire up our Arduino to the breadboard the ATtiny’s connected to. Technically this means wiring two devices together so that any instructions passed to the ATmega328 of the Arduino are also sent out to your ATtiny85.
Alongside ground and voltage, this means connecting the pins like so:

You’ll also need to put a small (10uF) capacitor between the reset and ground pins. This will prevent the device unintentionally resetting itself during an upload.
Under the ‘tools’ menu, you’ll need to select the processor along with an internal clock speed of 8Mhz. Then make sure that ‘Arduino as ISP’ is selected. You can then begin to upload some programs – but they’ll be at 1MHz rather than 8. To run at the faster speed, you’ll need to burn a new bootloader. Do this by selecting ‘Burn Bootloader’ at the bottom of the Tools menu.
If you have an external crystal, then you can make your ATtiny85 run even faster at 16mhz – for now, however, we’d suggest sticking to the slower speeds. Once you’ve gotten everything up and running, you can start adding additional components.
If you’d prefer not to use the Arduino as an ISP, you can instead use a dedicated AVR programmer. These devices come in different forms – the simplest being a USB stick with a slot in it for your 8-pin IC unit. This design eliminates the need for complicated wiring or soldering – SparkFun’s Tiny AVR Programmer is a great example. It provides eight breadboard-compatible outputs, which connect directly to the pins of the microcontroller. This also allows the programmer to be used with larger MCUs attached to a breadboard.
Using a dedicated AVR programmer requires that you track down and install the relevant drivers and select the ATtiny85 from the list of boards. Be sure that you don’t select an option that requires an external clock unless you have one attached; doing so may render your MCU permanently inoperable. Choose the ‘USBtinyISP’ from the Tools>Programmer menu and plug the microcontroller into the board, and you’re ready to start uploading sample code.
As we’ll see, not every Arduino project will work seamlessly on an ATtiny85. To make sure everything’s working properly, we’ll start with something simple: the ‘Blink’ project, which you can find under the Arduino IDE’s examples menu. You’ll need to connect an LED, along with an appropriate resistor, to the ATtiny’s ‘0’ pin. You’ll also need to change the pin number in the project from 13 to 0.
If everything is attached properly, the LED should blink at one-second intervals. If it’s blinking faster or slower, then the chances are that the clock speed is set incorrectly. If it isn’t blinking at all, then you should check your wiring.
Once you’ve gotten the blink program working, you can move on to other programs, just as you did when you first got your Arduino working. This version of the circuit, however, is more streamlined and elegant. If you incorporate a battery, you won’t need to use the Arduino as a power source - and you can detach it until you next need to load program data onto the ATtiny.
Burning the bootloader might seem like a lot of effort. So let’s take a look at some key features of the ATtiny85 that makes it worthwhile.
An Arduino costs more than 20 bucks, while the ATtiny85 costs less than a dollar. Even if you compare it to more feature-rich standalone microcontrollers like the ATmega328.
Coming with just eight pins, this is about as small as a DIP package gets, making it the perfect solution for smaller and simple applications, like remote controls.
The ATtiny85 doesn’t draw much power and can run on batteries for many times longer than more juice-hungry controllers.
For projects where efficiency is important, it’s a sensible choice. You can take a look at our power supply post for more info.
The ATtiny will accept any voltage between 1.8v and 5.5v, and adjust its logic levels accordingly.
This makes it easy to run from a range of different power sources, from coin battery cells to USB, and all without the aid of a separate regulator.
When you’re uploading code to your ATtiny85, you’ll find that nearly all of the commands you’ve been used to on your ATmega-powered Arduino UNO will work fine. There are, however, a few exceptions – given that the ATtiny lacks the hardware UART and i2c capabilities of the ATmega, any projects which incorporate serial transmissions and the Wire libraries are not going to work properly. Moreover, any projects which bring together many different components are going to be limited by the ATtiny’s smaller GPIO count and memory.
***
We’ve looked at how to get your programs onto your new ATtiny85. If you’ve got access to an Arduino, then using it as an ISP to upload code to your ATtiny is convenient – though investing a few dollars in a purpose-built programmer might make things even easier.
Once you’ve successfully gotten simple projects like the blinking LEDs working on your ATtiny, you can gradually move onto more elaborate ones. Making the switch from an all-in-one solution like the Arduino to a standalone microcontroller is quite a significant step, making your projects leaner, faster, and more efficient.