Microcontroller Roundup: Here's what you need to know
At the core of many electronics projects and products, you'll likely to find some sort of microcontroller. A Microcontroller is in fact a small computer on a single Integrated Circuit (IC).
Here at circuito.io, we’ve paid particular attention to one type of microcontroller: the Arduino board, which is built around Atmel’s ATMega328 chip.
The Arduino development platform is popular and accessible, making it a great point of entry into the world of microcontrollers, embedded systems and electronics in general.
With additional components, sockets and headers, the Arduino is easy to get along with, and it’s capable of serving a broad range of functions.
But of course, it also has its limitations, for example, It comes with only a fixed amount of GPIO pins; it’s relatively under-powered, and it lacks many of the features boasted by newer devices like the Beaglebone Black.
Once you've reached a certain point in your electronics expertise, you might start feeling these limitations. And that's exactly why we're writing this post to get you familiar with other microcontrollers and realize there's a wide range of alternative microcontroller boards available.
The ATMega328-powered Arduino isn’t the only option available to electronics hobbyists and developers. In fact, it's just one part of an enormous and bustling market that provides solution to different users - from makers tinkering in their garage to multinational corporations.

So what do the newer boards have to offer?
- First of all, they are mostly smaller and more powerful
- Wireless functionality and encryption are particularly popular among the more recently developed boards – and you’ll be able to use these functions without needing to expand your board with shields and other peripherals.
We’ve talked a lot about Arduino here on our blog, mainly because most of the MCUs we had up till now on circuito.io were Arduino boards. Recently we've decided to add another 32-bit microcontroller.
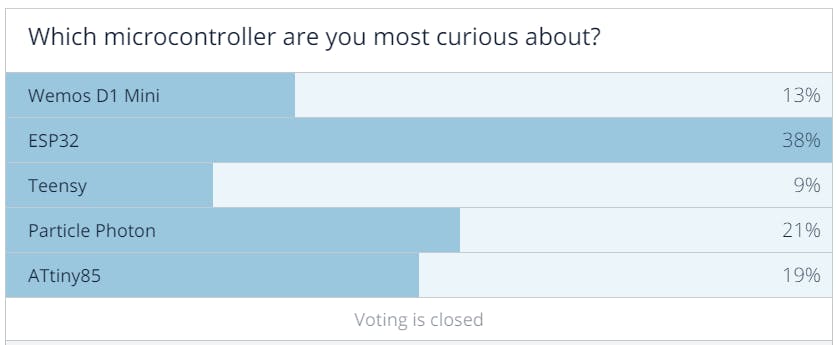
We narrowed down the list of options to 5, and asked you, our community, to help us choose which microcontroller we should add next.
The winning board was the ESP32. This board has built-in wireless capabilities, it's affordable and it has great documentation, and we can really understand why you chose it.
Let's take a closer look at the 5 candidates, starting with the winning board:
This prototyping board is the work of the Shanghai-based company Espressif Systems. It incorporates the ESP32, a microprocessor tailored toward wearable electronics and IoTIoT. It boasts integrated Wi-Fi and Bluetooth, along with an array of inbuilt antenna switches, and ultra-low power consumption.
CPU - Tensilica Xtensa 32-bit LX6 @ 240Mhz
Memory - 520KB RAM, 448 KB ROM
Wireless - Built-in WiFi and Bluetooth
Dimensions - 55.3mm x 28.0mm x 12.3mm
The company released the ESP8266 chip in 2014. Costing only a few dollars, this small chip is able to bridge an Arduino with a WiFi network, solving many issues that early IoT pioneers experienced.
It captured the attention of many talented engineers, who got it to co-operate with a range of programming environments, including Arduino. Within a few months, it's popularity started rising.

The ESP8266 does have a few downsides though: it has a small amount of GPIO pins, only a few A/D converters, and it's under-powered.
These issues were addressed by the chip’s successor, the ESP32, which was launched in 2016. It brought with it an improved spec sheet and the ability to easily connect with external microcontrollers.
The central processor is a 32-bit Tensilica LX6 dual-core, clocked at 240Mhz. You’ll get just over 500kb of memory to play with, along with support for external flash drives.
Wireless connectivity comes in the form of BLE Bluetooth and 802.11 b/g/n WiFi, bundled with a robust set of cryptographic hardware tools.
In addition, there’s an ultra-low power processor that’ll perform certain functions while the device is in deep sleep, which makes the ESP32 an excellent match for battery-powered projects.
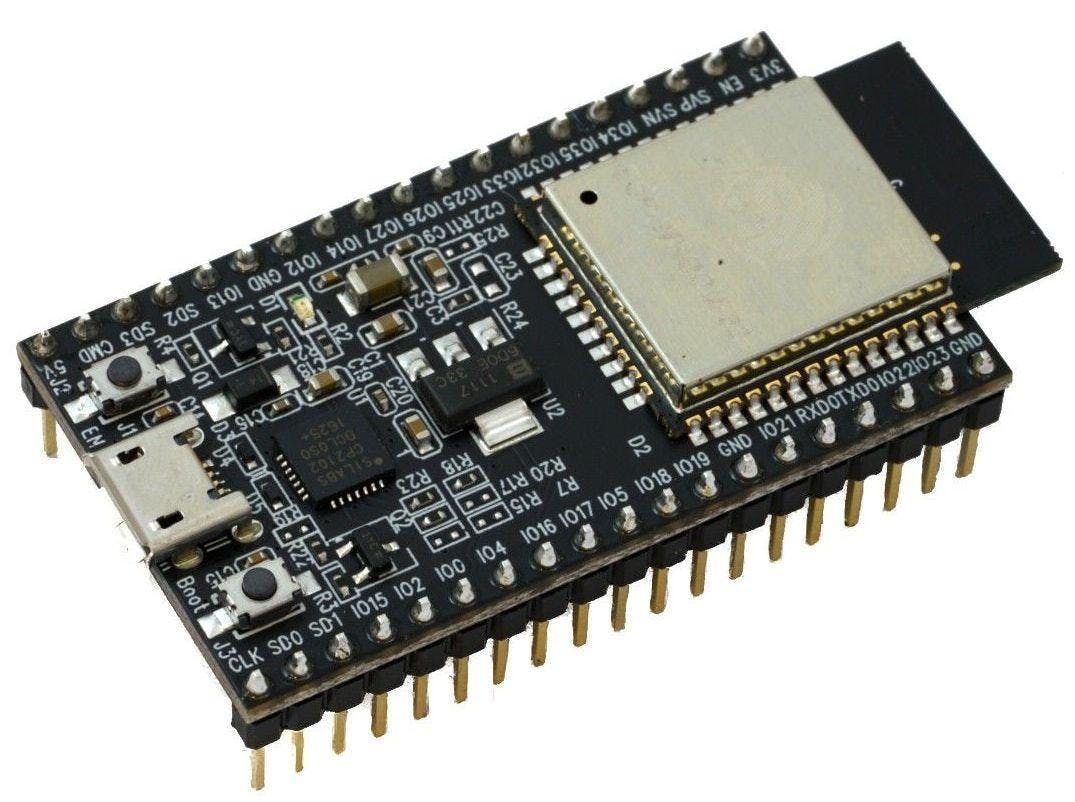
Unlike the Arduino UNO for example, the ESP32 DevKit pinout has been designed to slot directly into a breadboard and has 32 I/O pins.
This means you can basically plug it into the center of your breadboard and you’re ready to build a circuit around it. You’ll be able to plug it into your computer via a micro-USB socket at the far end, and there are two buttons on the top: one for resetting the device, the other for programming.
Being housed within a QFN package, the ESP32 microcontroller boasts enormous connectivity while still being compact and lightweight.
While it’s nowhere near as well-followed as the Arduino, it’s attracted attention thanks to the niche filled by its predecessor. There’s a significant community out there, and with Arduino IDE compatibility it’s easy to get started.
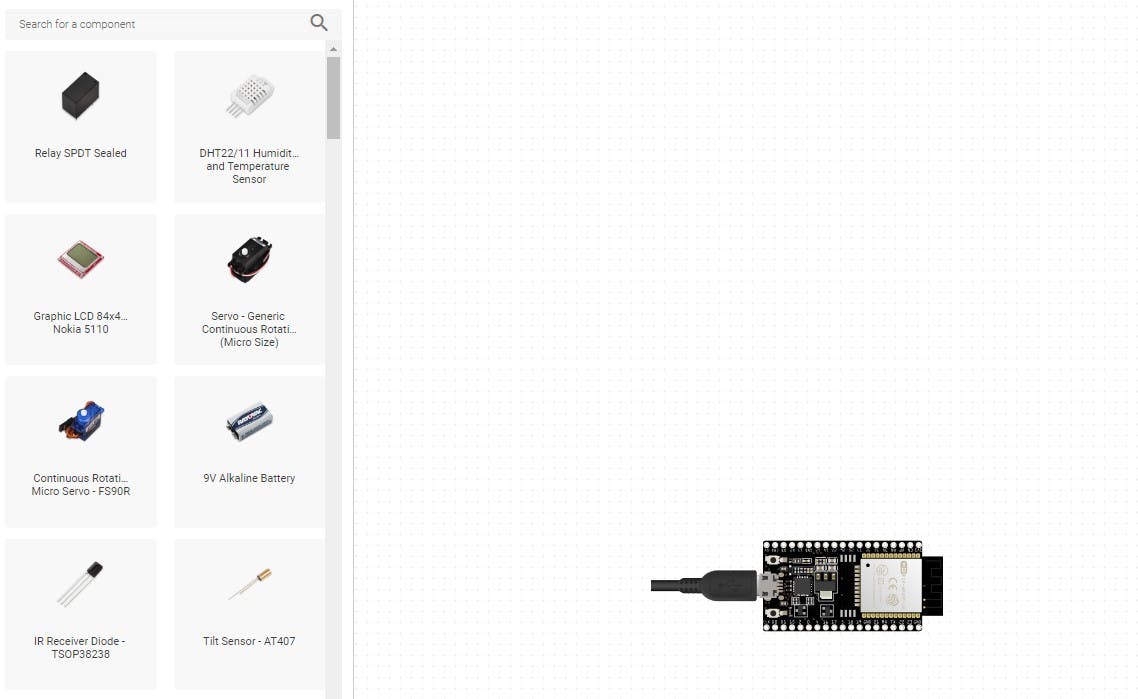
If you want to design a circuit using ESP32 dev kit, you can either type esp32 into the search box, or click on the "controllers" tab and locate it. After you find it, simply drag and drop it into the canvas. Alternatively, you can click on the ESP32 DevkitC icon and then click ‘swap’. This will replace the Arduino with the ESP32 dev kit. You can then add components in the same way that you would with the Arduino; wiring, supplementary components and breadboards will be added automatically.
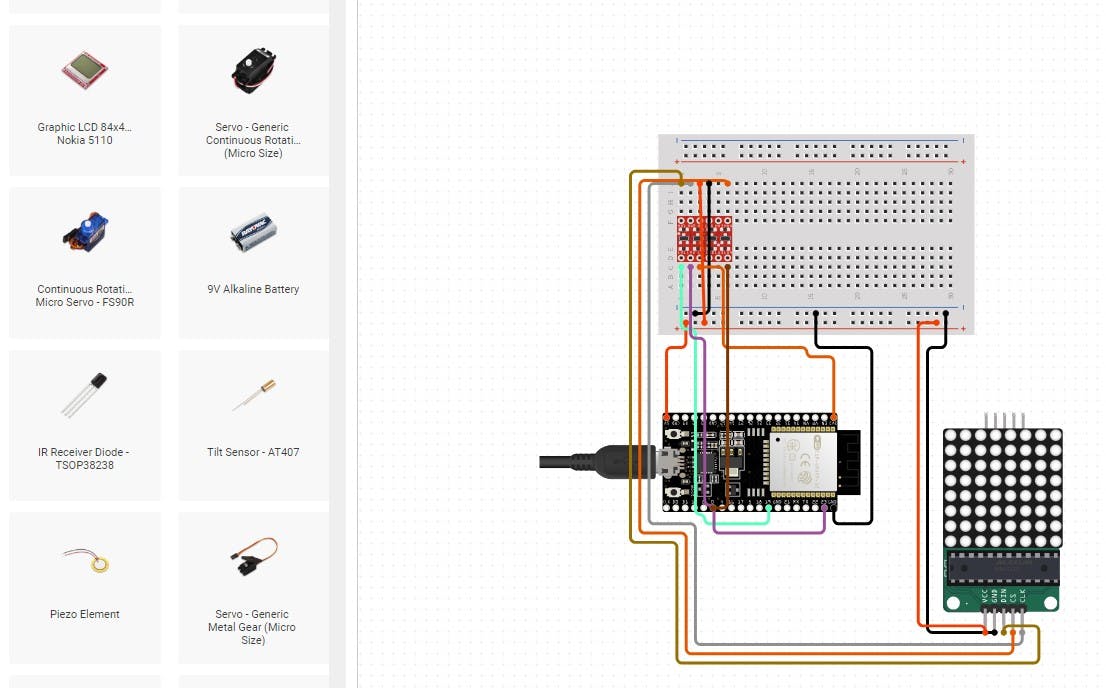
For example, if you’d like to wire up a 64-pixel dot-matrix display, you can simply drag it into position. As you can see, all the wiring and logic conversion is automatically taken care of for you.
* The ESP32 dev kit is currently in Alpha version on circuito.io, meaning it's not been fully tested by our team yet, and there is also no test code for it at the moment.
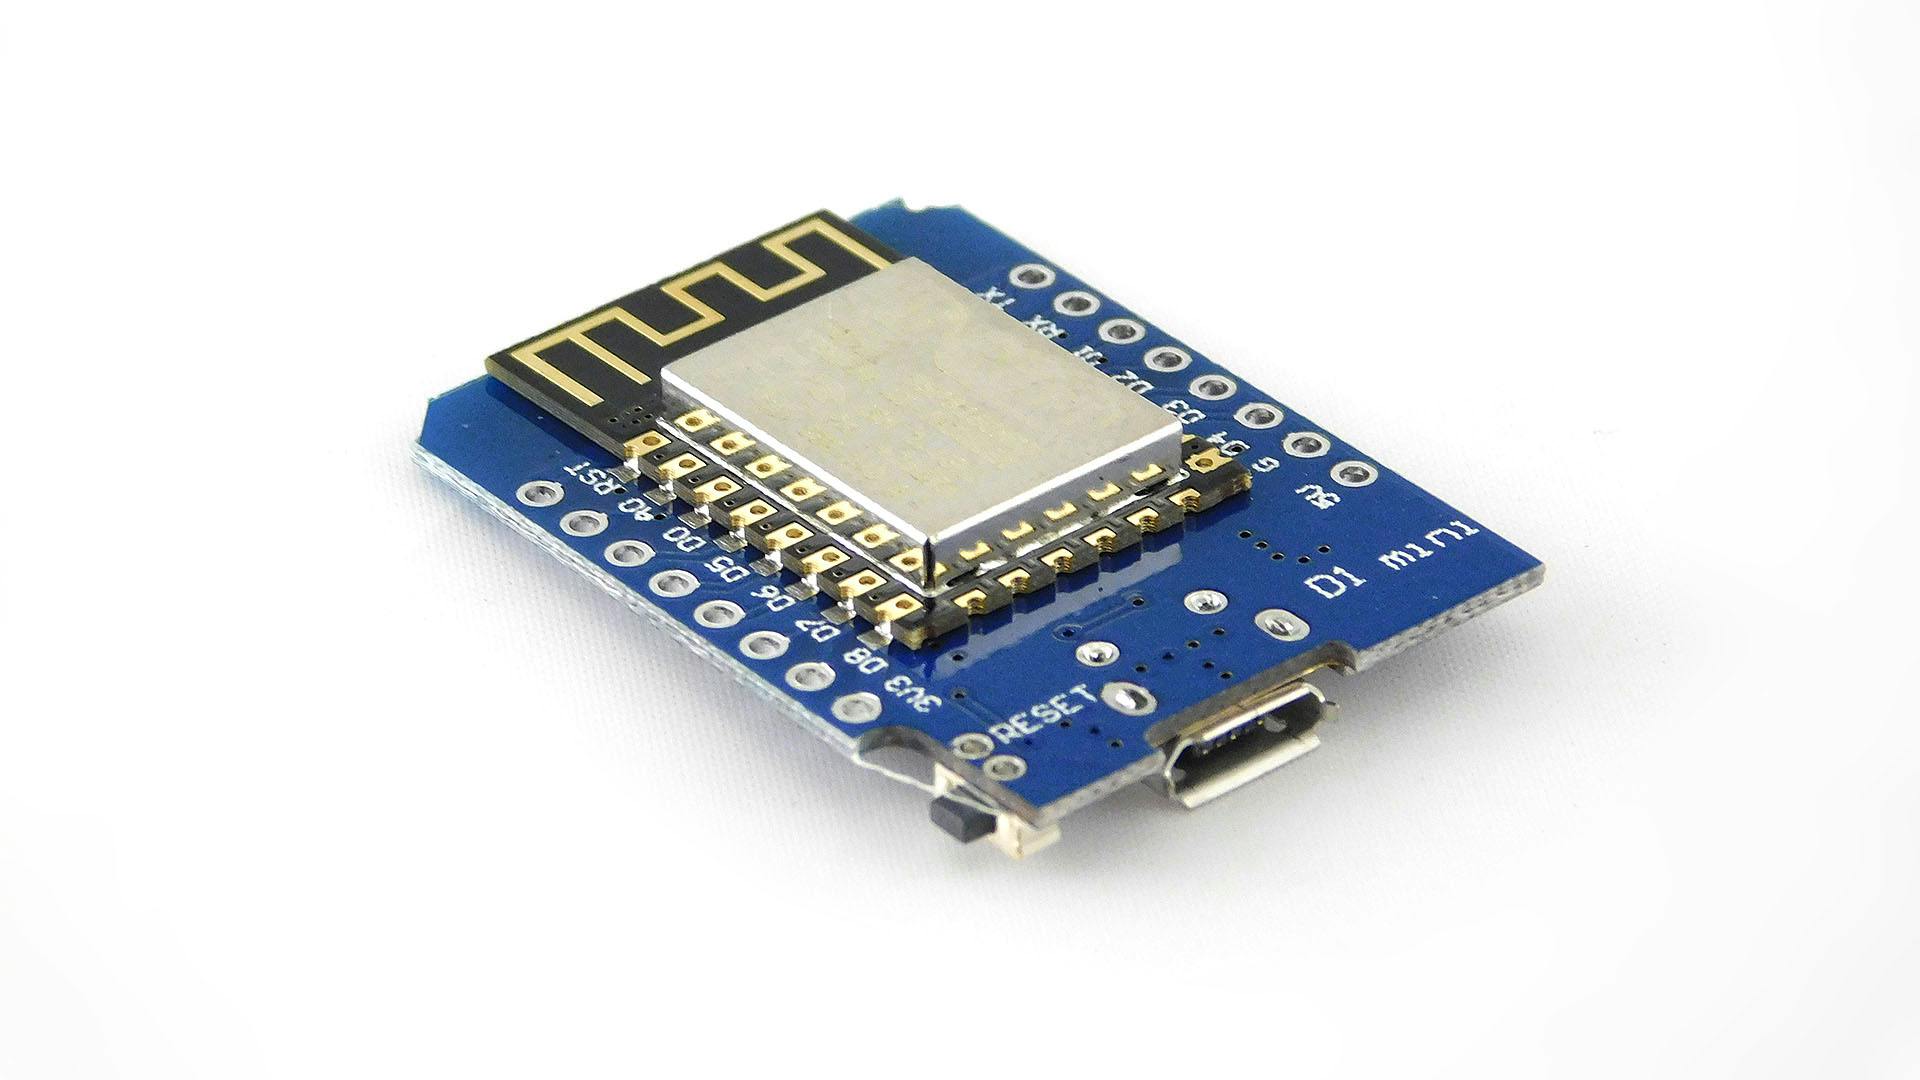
Of all the development boards to incorporate the ESP8266, the Wemos D1 mini is among the most popular – thanks in large part to its attractive price of around $6.
As the name implies, it’s a mini-sized version of its predecessor, the D1, but it manages to cram much of the same functionality into the smaller package, and functions like a mini Arduino with built in Wi-Fi.
CPU - ESP8266 EX @ 160Mhz
Memory - 64kb instructional RAM, 64kb data RAM
Storage - 4MB flash
Wireless - Built-in WiFi
Dimensions - 55.3mm x 28.0mm x 12.3mm
The D1 mini outperforms the Arduino UNO by an order of magnitude, and for a fraction of the price.
The ESP8266 chip clocks in at 160Mhz, and there’s 4mb of flash memory attached. Throw in built-in WiFi, and this becomes a worthwhile low-power candidate for IoT developers.
The board comes with a total of 11 digital I/Os that support interrupts, PWM, and I2CPWM, and I2C. An additional analog input, reset, and power pins bring the total up to 16 pins. The board slots neatly onto the end of your breadboard much like the ESP32.
The power consumption of the D1 mini is modest at just over seventy milliamps over WiFi, which makes this board just as suitable for battery-powered applications.
The D1 mini works with MicroPython, NodeMCU and Arduino, giving users different programming options.
Arduino users will probably want to keep using the Arduino IDE. To do that, you’ll need to install a free add-on, and download the corresponding file in the IDE’s Boards Manager.
You’ll be able to convert your existing projects over to the new hardware relatively easily, after renaming pins to the D1 mini pinout.
This is also an advantage for beginners, since they'll be able to use Arduino’s wide library of example projects.
With ESP8266 being such popular chip, you’ll find widespread support for the D1 mini. On top of the fact that widely-available Arduino libraries will work nicely with it, users will benefit from an active community that’s always willing to lend support to new users.
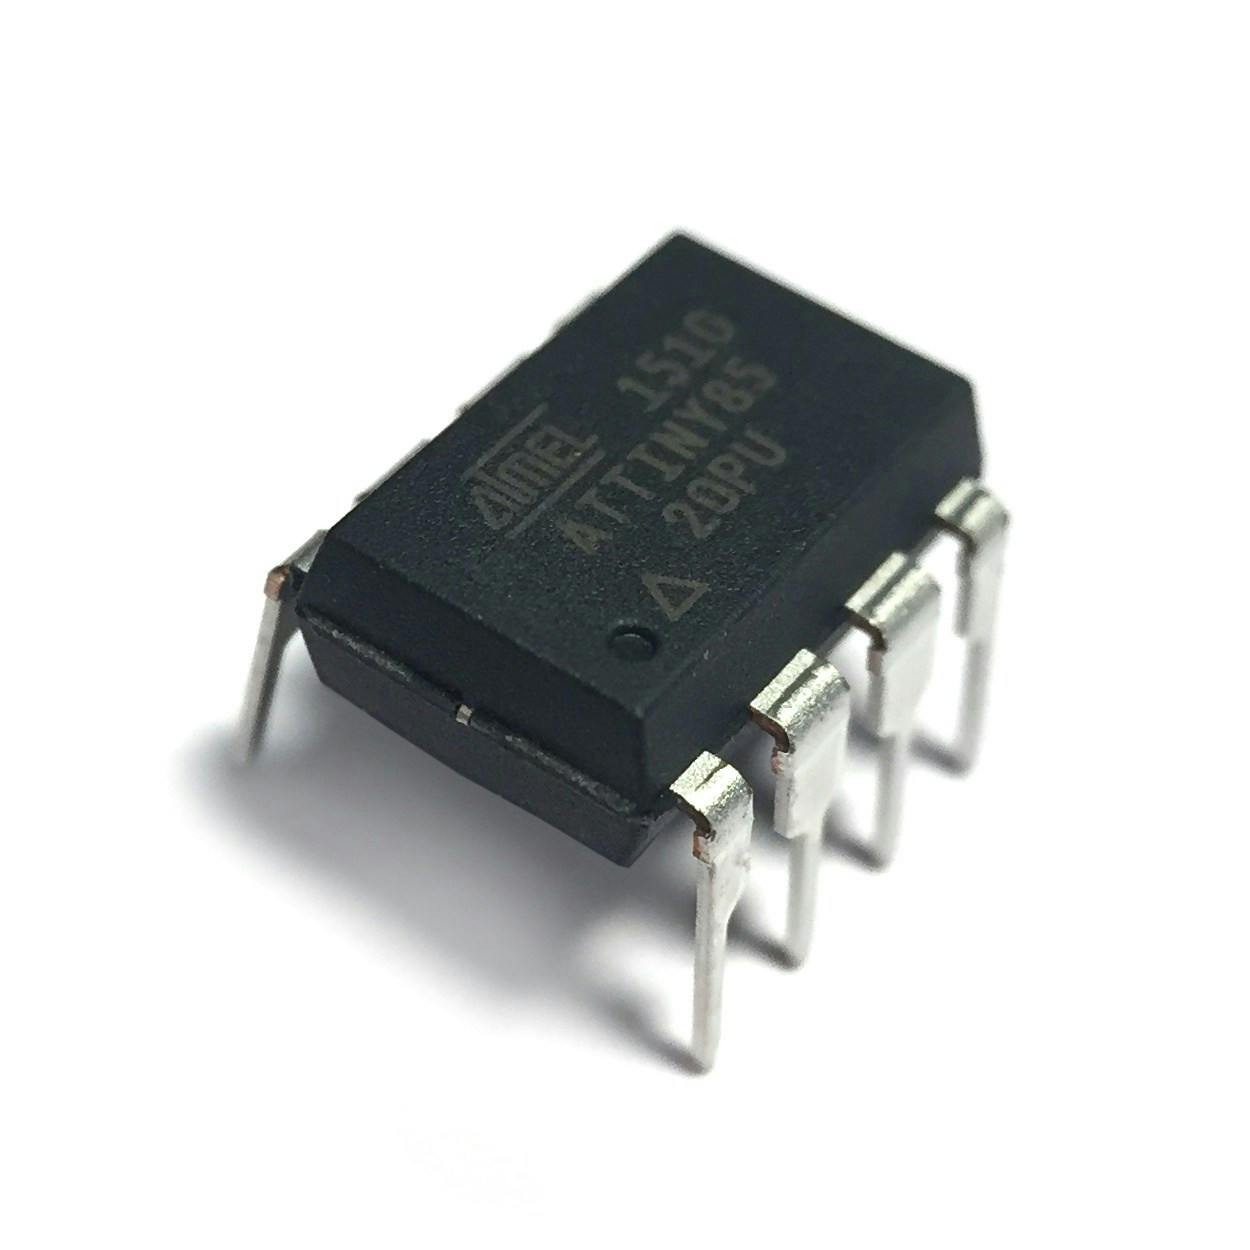
This little device from Atmel is a bit different than the other microcontrollers on this list.
It’s not a prototyping board, but rather a bare-bones microcontroller, without any included development platform.
Moreover, it’s just about as small as a DIP module can get. It comes with 8 legs and will slot nicely into the middle of your breadboard.
Being basically a miniaturized version of the ATMega328 that powers the Arduino UNO, it’s capable of running the same code – and it can be programmed using an Arduino with just a little adjustment.
CPU - 8-bit AVR @20Mhz
Memory - 512 bytes SRAM
Storage - 8K program memory
Wireless - None
Dimensions - 7.8mm x 5.3mm x 9.3mm
The ATtiny offers just 6 programmable I/O lines, and 8K of internal program memory. This compares to the 14 digital I/O lines and 32kb of memory found on the Arduino UNO.
Serial communication is also limited to SPI and I2C, and there’s no built-in wireless.
Working with a stand-alone microcontroller allows you to use only the features you need. This can significantly decrease the power consumption and cost of your project.
Its small size means that the device’s power demands are very reasonable. The ATtiny datasheet advises that it’ll draw up to 300µA (that’s microamps) when active, falling to just 0.1µA when it’s in power-down mode.
Since it lacks a development board of its own, you’ll need an external programmer to upload code onto the ATtiny microcontroller. If you’ve already got an Arduino, you can use it for this purpose.
If you're already familiar with the Arduino, you'll probably want to stick with Atmel (which is a big reason why Atmel are so happy to lend their chips to the Arduino project in the first place). It's a bit like Android vs. Apple users. Once you get used to something and you're satisfied with it, why make an effort to try something new?
The ATtiny has minimal setups that don’t require precise A/D conversion, and which don’t need masses of I/O pins.
With that said, a few external shift registers will enable you to expand the Tiny’s I/O capability to fit the needs of your project.
Getting to grips with a standalone chip will set you on your way toward understanding how microcontrollers interact with their supporting circuitry. To get one to work on its own, you’ll need to supply all the voltage regulators, capacitors, crystals and pull-down resistors that a development board normally supplies.
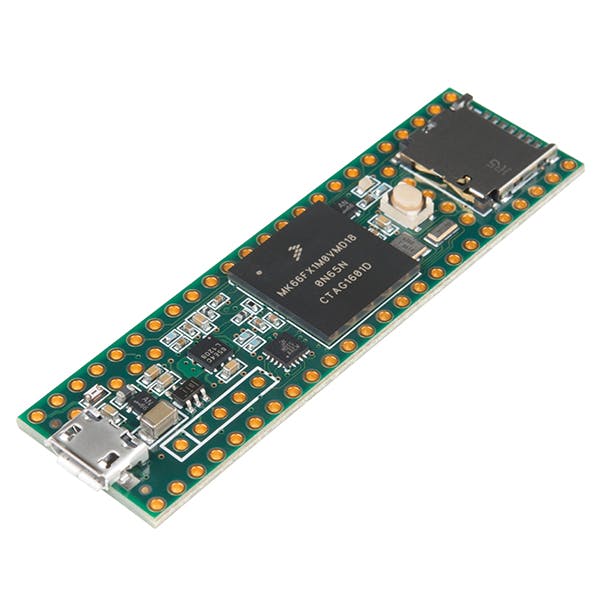
If you’d like to create something small but powerful, then Paul Stoffregen’s ‘Teensy’ platform offers a fantastic means of doing so.
Its construction shares much in common with the ESP32 development board, including twin rows of pins that sprout from the underside and allow for simple breadboard interfaces.
The twin flagships of the current Teensy fleet, the 3.5 and 3.6, were launched in 2016 following a successful Kickstarter campaign.
Here are the specs of the 3.6:
CPU - ARM Cortex 180Mhz
Memory - 256K
Storage - 1MB flash
Wireless - None
Dimensions - 17.8mm x 61mm
All Teensy boards are based on a 32-bit ARM Cortex M4 platform.
The Teensy 3.6 clocks in at a whopping 180Mhz, giving it a serious computational edge over the Arduino.
You’ll get 1mb flash memory, 256k of RAM, and 42 breadboard-friendly I/O pins. The Teensy also has USB and Ethernet connections and a bunch of hardware timers and serial ports.
When compared with the Arduino, the Teensy is seriously quick. Quick enough, in fact, that most applications outside of cutting-edge machine learning will come nowhere near testing its limits.
It’s physically longer than many of the other entries on our countdown, and offers 25 analog inputs and 20 PWM outputs. This power allows the board to do serious signal processing and output real-time stereo audio.
At just over 60 millimeters long, the 3.6 is larger than most prototyping boards, and this increased surface area is what allows it to accommodate such an impressive number of GPIO pins.
But if you don’t need the extra horsepower or pinout, then the smaller 3.5 or 3.2 boards will probably be a better option for you.
The 32-bit ARM microcontroller built into the teensy can handle USB without the need for additional circuitry. That's why you won't need the FT232RL (FTDI chip) found on the Arduino, which is part of the reason the Teensy is cheaper.
Though Teensy boards aren’t Arduino products, the Teensyduino add-on for Arduino IDE will allow many projects developed for Arduino to be easily imported, so that simple code that runs on Arduino can, in most cases, be easily exported to the Teensy.
You’ll only run into problems if you need to plug in a shield, or you’ve designed your project to physically accommodate the Arduino’s form factor. But these are problems you'd face with any other board on this list, and in general.
This tiny development kit is designed to help prototype and scale IoT projects.
It’s the work of a company named Particle, who’ve produced several other families of microcontroller development tools, including the Argon, Boron, Xenon and Electron.
CPU - ARM Cortex M3 120Mhz
Memory - 128KStorage1MB flash
Wireless - 802.11b/g/n Wi-Fi
Storage - 1MB flash
Dimensions - 17.8mm x 61mm
The Photon’s been engineered with Wi-Fi in mind. As such, it comes with impressive wireless connectivity, and the processing power to get the best from it.
This comes in the form of built-in 802.11b/g/n Wi-Fi, 1mb of flash memory and a 120Mhz ARM Cortex M3 processor.
Its strong processing power allows wireless encryption to be bundled in without the need for additional chips, allowing Particle to price this board at a modest $19 (though savvy shoppers might find one out there for considerably less).
For the price of a Photon you get all this, along with lifetime access to Particle’s impressive services. Like all Particle products, it’s built to work with something called the ‘Device Cloud’, a set of specialized development tools designed to help manufacturers organize their IoT lines. It offers things like wireless device management and over-the-air firmware updates, via which you’ll be able to upload code to hundreds of devices from the IDE.
And there’s a web-based IDE that you’ll be able to access from any browser for added convenience.
Of course, if you prefer to do things the old-fashioned way, you can still plug a mini-USB cable into the Photon and start uploading code. Dive into the device’s firmware, and you’ll be able to switch between automatic wireless connection (the default), semi-automatic, and manual. The latter option, according to the documentation offers ‘a lot of rope to hang yourself with’. However, it’s great for users who’d prefer to keep things local on boot.

If you’re used to programming in the Arduino environment, then making the switch to Photon presents something of a steep learning curve. And since the Photon isn't as popular as the Arduino, there aren’t quite so many experts out there willing to lend newcomers a hand. However Particle do have extensive documentation which partially compensates for this disadvantage. On their website, you can find an online guide for new users along with a series of useful tutorials.
Moreover, the feature list is growing: a remote diagnostic tool is in beta, which, once launched, will allow developers to check-in on units out in the field. This will save manufacturers the time and money spent dispatching engineers, and it’ll provide data that’ll inform maintenance decisions, and ultimately drive down overall costs. This alone is enough for many developers to opt for the Photon – and hobbyists with an interest in wireless electronics might be similarly tempted by this low-power, highly-connectable microcontroller development tool.
We’ve covered 5 devices with extraordinary potential. They can each do just about everything that the Arduino does, and a little more. Each of these boards has its individual strengths and weaknesses.
Some, like the ATtiny85, offer a means of doing the same thing as more substantial and feature-rich packages can do, but for a fraction of the cost. If you’d like to adapt your existing projects and learn how to take them off-board, then it’s sure to appeal.
If, on the other hand, you’d like to explore the newly-discovered and mostly-uncharted landscape of IoT, then specially-designed pieces of kit like the Particle Photon are worth considering. It’ll make it easy to create and maintain circuits remotely, and it boasts the power necessary to keep your data secure without the need for additional circuitry.
With that said, the microcontrollers listed here also have several features in common. Each can be easily inserted into a breadboard, and thus each makes a good fit for those looking to shrink down their projects. And they’re reasonably priced, mainly since microcontrollers have gotten smaller and more feature-rich over the years, and sport surface-mounted components that cram dozens of outputs into a few square millimeters of silicon real-estate.
It’s no coincidence that support for Wi-Fi is so widespread among MCUs these days, and that the winning device is equipped with both Bluetooth and Wi-Fi connectivity out of the box.
Wireless technology allows us to interact with the inner workings of our circuitry using smartphones and allows that circuitry to send emails, order products and send diagnostic information in a manner that’s elegant and convenient.
While your Arduino might have allowed you to keep track of the soil moisture in your garden, your ESP32 will allow you to log that information on the cloud and access it from wherever in the world you might be – and all on a single device.