The Internet of Things and Arduino: Modules, Platform and 6 IoT Projects
IoT projects are popular among makers, DIYers, and engineering students. IoT, short for the Internet of Things, is the ability to connect physical devices to the internet.
Up until a few of years ago, connecting devices and hardware components to the internet was not a simple task. Wifi modules such as Xbee were expensive and difficult to work with. Then came ESP8266 — a game-changer in the world of IoT projects. Today, using simple modules and device, you can turn almost any project into an IoT project. you can turn almost any project in an IoT project. With this ability in hand, you can get constant updates and alerts from sensors in your project and activate your devices from a remote location directly from your mobile or computer. In the makers' community, these recent developments became very popular in home automation projects in general and specifically in DIY smart home systems.
In this blog post we'll cover 4 different topics:
Creating IoT projects means that you need some sort of connectivity component or module, that will allow you to monitor and control your device from a remote location. In some cases, we'll use local connections, in order to connect to another device, and through that device, we'll establish a connection to the internet. We can divide these components into two main groups:
There are several different brands and types of components you can use to serve these purposes, and we’ll discuss them at length later on.
In short, like any other decision you make in your project, it really depends on what you’re making. Whether you decide to use one module or the other has to do with your project needs, and other considerations such cost, development environment, code language, and security.
On circuito.io there are 6 connectivity modules and 1 Wifi-enabled microcontroller.
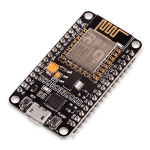
NodeMCU is a standalone, ESP8266-12e based microcontroller, great for IoT projects since it has onboard Wifi. NodeMCU has two “siblings” - WeMos and Huzzah, which are pretty much
the same but are made by different manufacturers.
Common uses: The NodeMCU board is really simple to use and it can be great for making small IoT projects that don’t require many components. Basically projects that are based on one or two functions. You’ll definitely have a good time working with this board, it’s very intuitive and simple to use.
The downside: NodeMCU has very limited GPIO and only one analog pin, and it also doesn’t have a built-in FTDI.
Updates: The newer version of NodeMCU is based on ESP32 and has built-in BLE and more GPIO.
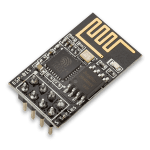
ESP8266-01 is a low-cost Wifi module enablingWifi network connection for MCUs. ESP8266 has a self-contained SOC (system on a chip), which means that it can also function independently without a controller. However, it is also possible to connect it to Arduino via serial communication, which introduces the potential for more GPIOs (General Purpose Input Output) in addition to other benefits.
Common use: ESP8266 is an all-purpose Wifi module so you can add it to virtually any new or existing project, alongside any board or component, to make an IoT project. If you want to learn more about ESP8266, there is a community forum dedicated solely to ESP8266.
The downside: The ESP8266 has limited GPIO. In addition, the software Serial connection is at times unstable compared to using Hardware Serial.
Updates: There are more advanced versions on the market today. For example, ESP8266-12 is integrated into many standalone Wifi boards, and the ESP32 is proving to be a great successor.
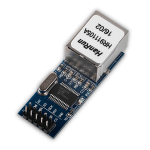
The ENC28J60 is a compact stand-alone ethernet controller with on board MAC & PHY, 8 Kbytes of Buffer RAM and a Serial Peripheral Interface (SPI).
Common use: Ethernet is a good choice for applications that require heavy data transfer and reliability such as VoIP (voice over IP), video streaming, home control,
security and more.
Note: This module requires cable connection and proximity to the router.
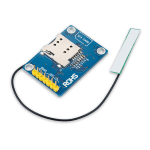
The SIM800L is an affordable and portable GSM breakout board and it has all the capabilities of the larger SIM900 shields, making it great for small IoT projects.
Common use: The GSM module can be used in IoT projects for things like voice calls, sending text messages, accessing the internet and even listening to FM radio and accepting AT commands. All you need is a valid SIM card and you should be good to go.
Note: If you choose to build your IoT project with the SIM800L make sure that 2G connections are still supported by your network provider, or else it won’t work and you’ll need to use a GSM module that supports more advanced cellular network connections.
Updates: Newer GSM modules such as SIM5320, SIM5360 are both 2G and 3G compatible so they can function as a good replacement for the SIM800L. The SIM7100 is also compatible with 4G and LTE networks, but it’s significantly more expensive.
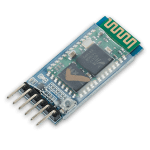
The HC-05 can be set to both Master and Slave modes, which enables it to communicate between two Arduino boards or any other devices (as opposed to the HC-06, which is only a Slave). The HC-05 usually comes with a breakout board for easy connection, and it communicates with the Arduino via Serial communication.
Common use: The HC-05 is good for exchanging lots of data at a close range, making it a good solution for wireless headsets and speakers and for file transfers between devices.
The downside: The range of the HC-05 Bluetooth module is only about 10 meters and it has high power consumption. Also, since the HC-05 runs on 3.3V, make sure to use a voltage regulator so that you don’t burn it.
Updates: The newer Bluetooth standard - Bluetooth 4, which is right up next :)
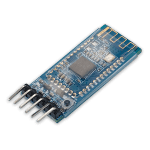
Bluetooth Low Energy or BLE has been on the market since 2011 when it was referred to as Bluetooth 4.0. Its key feature is low power consumption. This allows applications to run for a few hours on a small battery. BLE remains in sleep mode unless a connection is initiated. Connection duration for BLE transfers is much shorter than standard Bluetooth since the transfer rate is much higher - about 1Mps.
Common use: M2M communication and applications that need to transfer small amounts of data periodically such as personal measuring devices: blood pressure, heart rate sensors etc. It also has more industrial uses for monitoring sensors, geography-based apps, and public transportation apps.
The downside: BLE can’t hold continuous data streaming applications.
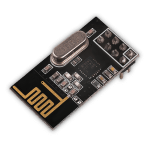
The NRF is a small-sized radio frequency wireless transceiver. It’s a very useful component for wireless projects since it’s easy to use, affordable, has good range and low power consumption. The module works on a 2.4G license-free ISM band and reaches up to 2Mbps in data speed.
Common uses: RF transceivers are mostly used for remote-control vehicles and drones.
The downside: NRF doesn’t provide an internet connection making its relatively long range limited compared to IoT devices.
Raspberry Pi is not a microcontroller or a component. It’s actually a small “computer” running Linux OS. Coding for Raspberry Pi is done using Python and not based on C++ like Arduino so the libraries are also different. Since Raspberry Pi has stronger processing abilities and built-in Wifi, its a great option for IoT projects especially ones that require heavier applications such as voice and image recognition. Here are some nice examples of Raspberry Pi projects we found on the web.
The ESP32 is the next generation of ESP8266 and was described as Espressif’s new wonder-chip. Besides its (obvious) Wifi capabilities, it also has a double core and 36 GPIOs. That’s a lot compared to its predecessor, the ESP8266, which only has up to 9 GPIOs. One other great thing about it is that it’s open-source, so there is much more documentation on it than there was on the ESP8266. You can find more technical details about it on Sparkfun’s Enginursday and the many updates on Hackaday’s blog.
Photon is Particle’s Wifi module. It has a lot in common with the ESP modules. However, if you want to work with the Photon, you’re required to work with Particle’s eco-system and web IDE, which is a great platform with many capabilities, but it may require some adjustments and getting used to.
Now that we’ve covered most of the popular hardware options for IoT projects, it’s time to move onto the next step - controlling your IoT project. There are quite a few options for doing this and they offer different services such as messaging, dashboards, cloud services, IDEs and more. Let’s look into them a bit more closely:
Dweet is a messaging service for IoT devices. It sends data from your device to the Cloud by “Dweeting” it with a simple API (sort of like Twitter). After collecting the data you can display it on a dashboard. Dweet works really well with freeboard.io, made by the same company (Bug Labs), and it offers a simple and intuitive display solution. If you select the ESP8266 for your circuit on circuito.io, you’ll notice in the code that we’ve integrated Dweet and Freeboard into the code, and you can set it up pretty easily from there. The instructions will appear in your circuit and you can also read more about how to set it up on the pet feeder project we posted on Hackster, in the “connectivity” part.
Blynk created a very simple and intuitive drag and drop dashboarding app, that works on both Android and iOS devices. It’s not tied to a specific board or shield so you can use it across different hardware components - Arduino, Raspberry Pi, ethernet, ESP8266 and so on. On their website, they have a sketch builder and code libraries that you can use, and they also have a very active user community that you can consult with on any issue.
Cayenne offers a wide selection of IoT services for both industrial and personal use. Once you sign in, you can select the controller you want to use, and you’ll get instructions how to set it up with the IoT connection of your choice and a device token. There are also video tutorials which make everything a bit easier. When everything is set up, you can build your dashboard using the cool widgets for measuring, monitoring and controlling your IoT devices.
Particle offers both hardware and software for the Internet of Things projects. Particle manufactures two types of processors: Photon for Wifi or Electron for cellular. Programming is done on their online IDE with structured building blocks. The platform includes everything you need to deploy an IoT project, including a device cloud platform, connectivity hardware and even SIMs for cellular products. If you want to read more about the pros of using Particle you can do so in-depth article by Larry Halff from Bright/contrast. And, while you’re at it, also check out Porter, which connects to your Particle and allows you to control and interact with your project through a customized dashboard. Talk about a full IoT experience.
You can find more IoT apps and services on our extensive maker tools blog post here. Of course, there are many variations and new solutions coming out all the time, so it’s best to stay up-to-date on the newest innovations. We’ll also update this post from time to time to keep you in the know.
Now that you have a better idea of how this whole loT thing works, we can get down to the good part—IoT project ideas! Basically, almost every project you make can be connected to the internet, but in some cases, it’s more logical than others. Some of the projects below are ones that we planned and built with circuito.io while others are simple and creative projects from other sources. We’d love to add more projects to this list, so if you have an IoT project you’d like to share with us, you can add a comment with the link below.
This automatic food dispenser for your dog is built with an ESP8266-01 wifi module and a PIR sensor. When the sensor detects movement, it triggers the servo and opens the dispenser. There’s a lot of different tweaks and additions you can add to this simple yet useful project.

A while back we made a mini-lift for our workshop so that we could pass components from one floor to the other without having to go up and down the stairs. It’s pretty lazy of us, but that’s what happens when you put a bunch of geeks with tools in a workshop. So this build was simple, we used a stepper motor for the lift itself, and connected it to our phones using Bluetooth. We used the HC-05 since we have a power socket right next to the lift, so there are no power consumption issues. It’s also totally possible to use a Wifi module to control this project, but Bluetooth is a more local version that we thought would be more suitable for this project.
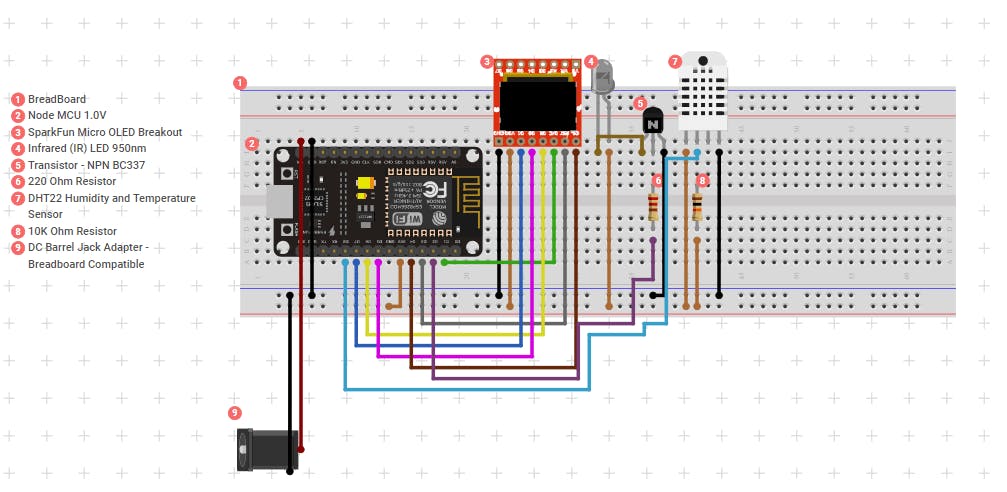
Smart thermostats are a classic IoT project. They can help you monitor the climate in your home, and control your heating and cooling solutions before you get home or after you leave (and who hasn’t forgotten the air conditioner on for hours and hours after leaving the house?). We used a NodeMCU for this project because it doesn’t need much more than that in terms of GPIO. The components are pretty basic, and also the circuit you need to put together. If you want to make this project even more efficient, you can use it to monitor and control your electricity consumption.
If you’re more into moving objects, you can control an Arduino robot with the ESP8266. In this project, the robot is given commands through the smartphone. Those commands are received through the ESP8266 device. The creator of this project could have also chosen to make this project with an InfraRed sensor, which would allow him to control his robot remotely. However, using your smartphone for this type of project opens up a much wider array of possibilities. Plus, you can also build your own app and customize it to fit your vision. And, after all, isn’t that what making is all about?
This soil moisture monitoring system was designed specifically orchids, which are very sensitive to moisture and require special water monitoring. Moisture levels can be tricky to monitor, therefore, you'll see that they used digital pins to power the sensor then convert them back into analog inputs. If you uncomment the push notifications in the code, the system will alert you when the moisture levels are too low.
A nice little IoT project that can help you measure voltage, current, and power supply; in this case, you’re measuring those properties on a solar panel. The meter is connected to Cayenne which we’ve already mentioned earlier.
The ability to connect devices to the internet opens up a world of opportunities since it creates a gateway between the physical and online world. Whether you're a maker, prototyper or engineering student we hope that with the information and project ideas presented here, you have a good base to start your own IoT project! Since this is a pretty hot topic, there are new components and apps coming out all the time, so we'll try to update this post from time to time. We're here to answer your questions if you have any, and we'd love to see your makings.