Arduino Motor Guide - 6 Arduino Projects with a Spin
In this Arduino motor guide, we'll cover the basic information you need to know before choosing a motor for your project. If you've been working on DIY electronics for a while now and you're feeling fairly confident in your abilities, you may be looking to up the challenge and reward, by working on bigger, better and more complex inventions. When it comes to advanced builds, motor-driven creations such as robots based on Arduino are often among the most popular; and with good reason, they're pretty awesome!

There are a lot of different types of Arduino motors to choose from and each has their own strengths and weaknesses. For that reason, you'll find that not every motor is ideal for every task, with some excelling in certain areas but not really cutting it in others. Today we will be taking a close look at some of the many types of electric motors that you're likely to come across when shopping for your electronics, along with some tips on how, when and where to use to use a particular motor to make sure you've always got the right kit for the job based on what you need your new motorized project to do.
And for some inspiration, we'll also be taking a quick look at some of the motorized builds we've put together to help get your creativity flowing, as well as demonstrating the functionality of some of the motors we'll be looking at. So if you're an aspiring creator looking to get the low down on Arduino motor systems so that you can take your builds to the next level, then you're definitely in the right place.
Servo motors are among the most popular motors used by hobbyists who require motor functionality when working on their Arduino projects.l The reason for their popularity is the fact that servo motors are immensely versatile electric motors.
A servo motor is a short name for a regular DC motor coupled to a sensor for position feedback and a small control board. This makes it easy to control the motor right out of the box, through your Arduino using a PWM signal. Servo motors are top choice among hobbyists and are used extensively throughout the modern industry and particularly in robotics where they have proved highly adept at providing fine motor control for robotic limbs as well as mechanized prosthetics used by amputees.
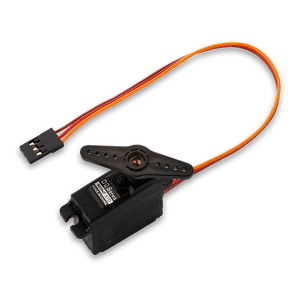
A servo motor in general terms can be a linear or rotary actuator, which is to say that it is capable of precise control of a linear or angular motion. It is not in point of fact, a single motor type by itself, but is instead a combination of a motor, control circuit and sensor for positional feedback combined into a single working
unit.
While some servos are designed to operate based on analog impulses, those commonly found in the hobbyist marketplaces are much more likely to be PWM controlled servos that are designed to work with the microcontrollers. With the help of a motor driver/amplifier, the Arduino (which in the control circuit is referred to as the indexer) controls the order of electrical impulses that are sent to the motor via the amplifier.
Pros
Cons
While it may be a bit outdated, the standard Direct Current (DC) brushed motor is as simple as they come. Easy to assemble and cheap to make, they are found filling practically every role where electric motors are called for.
The DC brushed motor consists of an odd numbered set of conductive windings arranged around a central axle to which the commutator is attached. The outer assembly contains two magnets with opposite polarities. As the windings are energized they are charged and begin to get attracted towards the outer assembly resulting in rotation. This charge is altered as the brushes come in contact with the commutator and so allows the windings to continue to experience attraction towards the outer assembly, allowing the motor to rotate as long as power is provided.
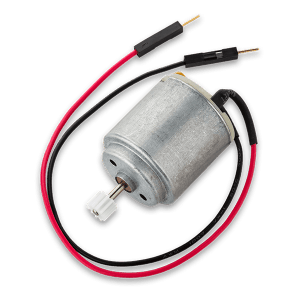
As you'd expect, simple motors are simple to control. In terms of power, increasing voltage or amperage can adjust the motor speed of rotation (RPMs) or Torque respectively. To reverse the direction of the motor, a simple polarity reversal of the motor contacts is all that is required.
To achieve the greater precision demanded in modern applications, DC brushed motors may be paired to a device called a wheel encoder/ Rotary encoder. These devices are able to read and sense the angular position of a motor's axle and later the microcontroller converts the output signal into digital information. This data can be used to determine location, motor speed and acceleration of the motor it is attached to.
Pros
Cons
A variant of the regular DC motor, the stepper motor is the go-to choice when you need a motor capable of tightly controlled movements to provide precision beyond the capabilities of a standard motor. They are commonly used in the printing industry as well in simple robots such as factory robot arms configured for specific tasks.
Unlike other motors which are intended to provide unlimited rotation when in use, stepper motors are designed to move a particular number of 'steps' at a particular speed when powered up. With each charge of the motor providing enough power for a single step. How small each 'step' indicates the overall accuracy capability of the motor.

Unlike other motor types, the stepper motor is designed for use with more advanced electronics in order to take advantage of the fine motor control that it is capable of. For that reason, stepper motors require a driver circuit which connects it to a control system (such as an Arduino) capable of regulating power to the motor.
Pros
Cons
An evolution of the brushed motor, brushless motors are quickly becoming the motor of choice for many hobbyists and enthusiasts owing to the immense potential and improved reliability over their predecessors. Like brushed motors, they provide a good deal of torque as well as being able to operate reliably at high RPM. This makes the brushless motor extremely versatile, very capable as an Arduino Motor and particularly popular with those building RC cars or drones.
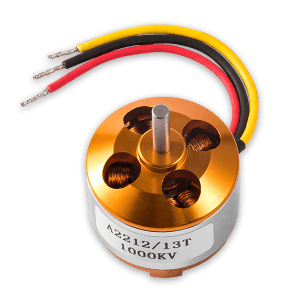
The brushless motor uses an alternating current to create opposite charges between the windings and the magnets on the outer assembly. In this design only the outer assembly attached to the axle rotates; the benefit of having only a single moving part combined with removing the need for contact brushes is that brushless motors enjoy higher energy efficiency, longer operational lifetimes, smooth delivery of mechanical energy to the axle and low friction.
While harder to control than a simple brushed motor, the use of modern technology has made them much more simple to control via computers. Hall effect sensors, which can detect changes to magnetic fields and translate that into digital information are often used with brushless motors to monitor and control their output, just like wheel encoders are used with brushed motors.
Pros
Cons
Start a Brushless Motor Circuit
Choosing the right motor for your project will often depend on the type of project you're attempting to build and what performance indicators will determine the ideal motor for you. There are three main parameters that are co-dependent, that we need to take into consideration when choosing the right motor for our project
While we won't be delving into serious math and physics in this article, an understanding of your motor's torque rating and how it influences your decisions when picking out your projects motor is important, in order to make sure you select a motor that meets your needs or expectations adequately.
Simply put, a motor's Torque rating is the amount of rotational force that your motor is capable of exerting on a load. Torque is determined by a simple formula:
Torque = Distance from axis of rotation X Force
For an example of how torque affects your creations, we can look at another field where torque is important, the automotive sector. When ascending hills or steep roads, an engine with a high torque rating is preferable as it is able to apply greater force to the load (the vehicle) allowing it to travel up the hill even at low speeds or a standing start.
A high torque rating is important for maintaining high rotational motor speed such as in a drone. A high torque motor can change RPM values quickly, an ability which should translate into smoother more responsive performance from an electric vehicle using such a motor. Good options for those looking for high torque motors are a standard DC brushed motors which, while cheap, has a shorter lifespan and requires more maintenance or a more expensive but more reliable and energy efficient DC brushless motor.
Keeping your motors torque rating in line with your creation's needs is important to ensure long-term operation as a torque rating that is too low makes your creation inoperable, while a torque rating that's too high could cause mechanical stress during operation. While the risk of catastrophic failure due to excessively high torque ratings is low when it comes to DIY electronics, it can still cause parts to wear out faster than they should and shorten the operational lifespan of your new invention.
In this context, Velocity is the speed at which the electric motor rotates. This angular rotational speed is measured in revolutions per minute or RPM and along with torque are the two main factors that influence motor performance. In slightly oversimplified terms, where a high torque motor is good at moving heavier loads at a slow speed, a high RPM drive system will allow for higher speeds while reducing your overall load carrying capacity.
When adding an Arduino motor to the project you need to take into consideration your power supply- wall or batteries and make sure that the motor voltage characteristics are met in order to get the most out of it.
For advanced builders, a gearbox, similar to those used in regular cars allows motors to function well in both capacities as the need arises. As those of you who drive will already know, lower gears give you plenty of torque to start moving but you need to quickly change up to 2nd and 3rd gear to maintain acceleration. And if you've ever tried moving from a standing start in a high gear, say 4th or 5th on a manual transmission, you'll know how a high RPM without sufficient torque or inertial momentum is going to get you nowhere quickly.
In general, a brushless motor is a great option for those who want a reasonable torque along with reliability and energy efficiency even at higher RPMs but are not interested in dealing with the weight and complexity of a gearbox.
When choosing an electric motor, it's important to select one that is able to provide the power you need while still keeping its power draw within acceptable limits. Wattage (electric power) is Volts X Amps. While the voltage is linked to increasing a motor’s RPMs, likewise a higher amp rating is needed to increase torque. While having a powerful motor rated for high voltage, high amp operation, this translates into heavier power load requirements.
While this is unlikely to affect projects that rely on power from wall sockets, projects that are intended to be more portable such as unmanned vehicles, robots and wearables will have to take the motors requirements into account as the batteries powering the project will need to be set up to provide sufficient power. For this reason, motors that are as small, light and efficient as possible are always favored when it comes to developing portable electronics in order to minimize power draw and weight (both of the motor itself and the size of the power source needed to operate it).
There are many other factors that go into picking out the right motor, but having a good understanding of these 3 main criteria should be enough to steer you in the right direction. While any electric motor can, in theory, be adapted to serve practically any function with a bit of ingenuity, you should now have everything you need to pick out the optimal motor/s that best suit your project.
In the next section, we'll be looking at the practical applications of some of the motor types we've discussed above with a few projects that we put together here at circuito.io.
We've always got some interesting projects being put together here at circuito.io and for this section, we wanted to highlight a few of our Arduino motor projects that utilize a variety of motor types and really showcase what you can do with each one.
Each project title is linked to that project's page where you can learn how to control different motors as well as access the link to our builder tool where you can modify one of our featured projects or even create your own from scratch, quickly and easily.
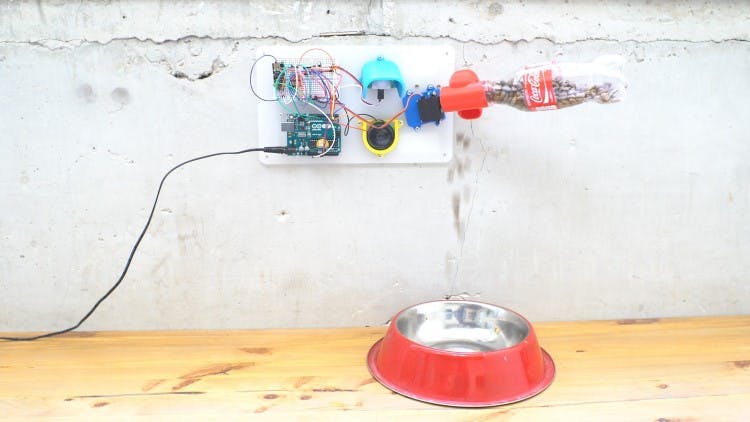
This internet-enabled pet feeder was the perfect job to be handled by a single servo motor since the rotational range needed to dispense the food was limited. Using the servo motor here proved to be a cheap, compact and easy to use solution since it required no additional parts to function, requires only a minimal power supply and will be reliable even for long-term usage.
For the line follower robot we used 2 standard dc brushed motors. Brushed motors are a good choice when putting together small wheeled bots like this one since the motor with gear provides high torque, easy to control and is super cheap.
Since the bot is so small and light, the energy savings from upgrading to a brushless DC motor isn't really needed. The gear addition is needed for this project to convert the DC motor's speed to torque. With the use of a DC motor, coding is fairly simple and acceleration and speed are easily controlled. However, you will need to create a separate drive system to take commands from the Arduino and turn those commands into electrical impulses aka DC motor driver. You may also require a Rotary encoder or a similar device to convert feedback from the motor into digital information so the Arduino can keep track of its own position and progress.

This classic project is one of the best ways to showcase servo Arduino motors in action. The robotic arm uses 3 servo motors in total, one for each of the arm's joints providing the necessary actuation.
Since this robot arm operates on a simple pre-coded command rather than actively detecting objects to interact with within its reach, this project is perfect for those new to Arduino motor projects or even for beginners who want to get started with a more complex project that they can really sink their teeth into.
An important factor to account for is to make sure the servo motors you use are powerful enough to operate effectively based on the intended size of your robot arm.
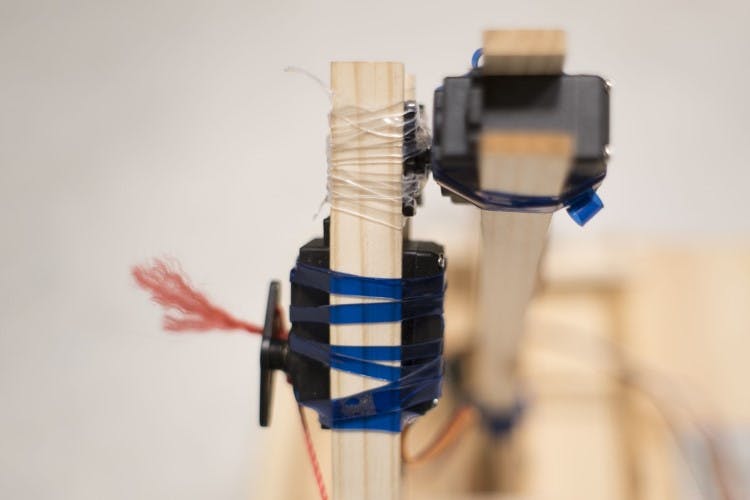
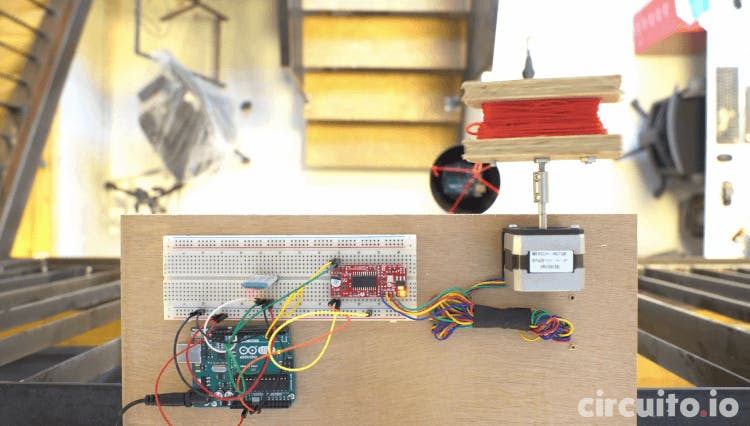
Here we demonstrate a stepper motor set to raise or lower a small container that serves as the lift 'car'. The motor was set up so that it could extend the car downwards by rotating in one direction and retrieving it by rotating in the opposite direction until the 'car' goes back to the original position. By pre-programming a number of rotational steps needed until the lift 'car' was safely in the lowered position the system was able to operate the lift without a hitch. This setup will work well provided the weight of the load in the lift is not too heavy to cause the step motor to lose traction causing it to miss steps and get out of proper alignment. One way to overcome this setback and increase the weight capacity would have been to add a gearbox to the motor to improve torque. Alternatively we could have opted to substitute the stepper motor with a standard DC brushed motor with a gear as well; combining its naturally higher torque rating with an additional limit switch to provide the Arduino control unit with positional information so that it would be able to gauge the rotations and provide similar control over the lift as it had when using the stepper motor.
The photography turntable is a project we wanted to build for a long time since we have to take 360 images of the components we use and the projects we build. We researched online and saw that many of the turntables use servo motors, but we thought that in this case, a servo motor won’t be precise enough, so we decided to use a stepper motor. Another advantage of the stepper motor is that the programming is more simple - using the motor’s steps to for measuring the distance between the shooting angles.
Last, but not least on our list, is the animatronic tail, one of our more complex builds and our very first self-contained, motorized wearable. The assembly consists of 3 servo motors arranged around the base of the tail.
As we wanted to keep the servos close to the base, we needed to figure out a way to provide multi-directional movement without having servos located in the other joints of the tail. This was achieved by connecting each servo to a pulley wheel which converted the angular rotational movement of the servo motor into a linear push/pull effect on the tail via threads that maintained tension between the pulley and the tail. In addition to programmed tail movements, a joystick was also fitted to enable the operator to manually control the tails movement for more animated or emphasized actions.
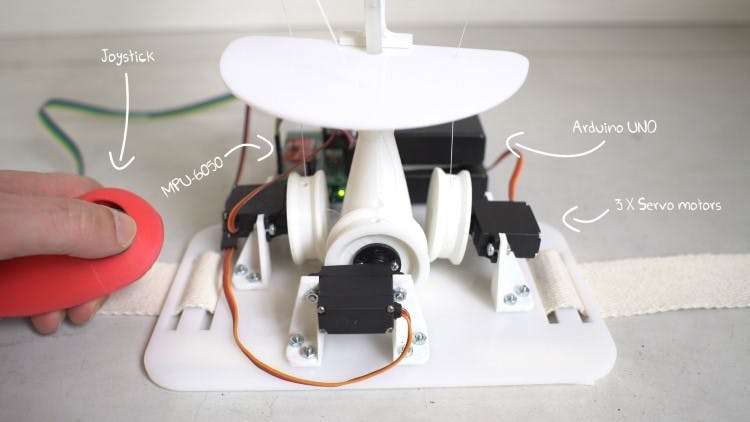
The servos, which were fitted with metal gears to provide extra strength, were arranged around the tail's base enabling it to move left and right as well as up and down. While this creation was somewhat challenging and required some complex assembly, by keeping the motors and batteries all close to the tail base, weight distribution was as good as we could have hoped with no batteries, motors, or wiring needed further out in the tail, which was kept empty and stayed well balanced and comfortable to use.
While it may seem complicated at first, choosing the right motor for your next Arduino creation is actually quite simple once you understand what each motor type excels at; as well as having a clear understanding of what you expect or require from your selected motor in terms of power and torque in order for your creation to function effectively.
Beyond performance requirements, it's also important to keep in mind other factors such as your experience levels and familiarity with certain motor types as well as their cost, when making a purchasing decision or speccing out a new creation. If you're familiar with a certain type of hardware or already have a few motors lying around, it may work out much cheaper to simply design your build around what you have handy or are comfortable working with rather than going in for additional motors, saving you time and money in the long run.
We hope you found this guide useful and informative that will help you make your next DIY creation everything you wanted it to be. Did you enjoy this look at electric motors in more detail? Let us know. We always love seeing what the community is building, so if you've got an Arduino motor invention you'd like to share with us and the community, feel free to talk about it and post some images or links in the comments.